“-here and there a yellow leaf shows
itself like the first gray hair amidst the locks of a beauty who has seen one
season too many."
- Oliver Wendell Holmes

Fall
is here, even if the calendar doesn’t say so yet. At least here in Michigan it is, the leaves
are beginning to turn and everything looks a bit old and jaded. The light is softer and weaker, the mornings
shrouded in fog. We’ve had some really
cold nights here 38 degrees one night, but I won’t let my husband turn on the
heat just yet. I still want the windows
open too so I can hear the crickets and smell the wood smoke in the air. I want to squeeze every bit of summer out of
the season. So I just get out my warmest
nightgowns and sweaters.
My
hardy hibiscus are finally blooming, that’s it, there’s no more first blooms
left unless you count the cup and saucer ( Cobaea scandens) vine that’s growing
on the rails of the ramp. I started it
from seed and planted it in front of the ramp where a “spot light” of sun peeks
through the mostly shaded area. It’s
grown like crazy and now has lots of buds but it looks like it will be a race
between it blooming and frost.
Harvest
is wrapping up. Our apples are beginning
to ripen; my husband picked the red delicious today. This week I begin to tear up the vegetable
garden, removing all that’s left but maybe the tomatoes and peppers. We are
supposed to have a warming trend for a week or so and some more tomatoes and
peppers may ripen.
I’ve
got the chicken coop cleaned out and ready for winter. Pullet eggs are beginning to be laid from the
new batch of hens I’m raising. The
chickens are going to bed by 7 pm now, another sign the summer is leaving.
I
worked this weekend to get the windows cleaned and new hangers up for plant grow
lights. I’m going to begin bringing in
the houseplants that summered outside, a few at a time because it’s a major
job. I hate to bring them inside because
they do so well outside, but I don’t like to be in a rush to do it, as when a
frost is coming that night.
The
remnants of hurricane Irma may brush us tomorrow. We need some rain. I really feel sorry for those of you who may
have lost whole landscapes to Irma’s destruction. All the stately old trees, the beautiful
flower beds, destroyed by wind and flooding.
It hurts to think about it. But
plants grow back. Some people lost their
homes and even their loved ones. Those wounds are much harder to heal. I’m hoping for sunny mild days and calm conditions
and lots of help for those of you in Florida and other places Irma visited, so
you can begin to re-grow your lives as well as your gardens.

Frost- why it
happens and what to do
For most
of us the first frost is rapidly approaching.
I narrowly escaped losing my indoor plants to frost on Saturday
night. I was waiting before bringing
them in because the weather is supposed to warm again. But Saturday night the temps lowered to 38
and the dew point to 36- and that’s getting close. Luckily I can see no damage to my plants,
even the tropical ones, from the cold.
Frost
can occur when the air temperature is above freezing if the dew point is at 32
degrees or less. The dew point is a measure
of when moisture will condense out of the air and form dew or frost on objects
that are as cool or cooler than the air. Drier air has a lower dew point. Things
above ground, cars, roofs, your plants will be slightly colder than the air
temperature and when the dew point is 32 and the air temperature 35 degrees or
so the dew becomes frost. The surface of the objects with frost on them was 32
degrees even if the air was not. Moist
soil helps dew or frost occur, as moisture is drawn out of the ground. Plants
also transpire or give off moisture.
A freeze
occurs when the air temperature is 32 degree or less, regardless of the dew
point. Frost also occurs with a freeze
if the dew point is 32 or below. But you
can get a freeze without having frost.
Wind,
even a light breeze, can prevent frost from forming because it mixes warmer air
from higher in the atmosphere into the colder air laying close to ground
level. When it’s cloudy and the
temperatures are above freezing frost generally does not occur because the heat
from the ground does not radiate off into the sky. Clouds act like a blanket.
The best
time to get frost is when the dew point is 32 degrees or lower, the air
temperature in the 30’s, winds are calm and sky clear. Day temperatures will probably
not have been above the 60’s. Gardeners
who are worried about bringing in or protecting plants should watch the weather
predictions carefully on those fall days when they know it’s going down to 40
degrees or lower at night and clear calm conditions are predicted. The National Weather Service will issue a
freeze or frost warning but that sometimes doesn’t happen until the evening
when the frost is predicted.
You
should also know when the average first frost for your area will be. I have provided a map from the USDA but you
should also ask gardening neighbors or your local county Extension office for
more exact information. My average first
frost is around October 1 so I like to have tender plants inside before
then. The weather in September is my
guide though.
There
are also micro climates in every area which could be colder or warmer than the
general area. Your home area could
experience frost before your neighbors.
Generally low areas and very exposed areas will be more susceptible to
frost. Areas next to house foundations
or on higher ground are less likely to get frost early.
Frost and your garden
Many
perennials hardy to your area will not be affected by the first light
frosts. But tender
perennials and most annuals will be harmed by even light frost. Some annuals will not be affected until a
hard frost or freeze, this is when temperatures dip into the 20’s. Frost damage generally causes blackened,
wilted foliage. It can show up in just a
few hours after frost exposure. After a
light frost only the top leaves of plants may be affected and some plants will
recover from the damage and bloom a while longer.
 |
| Frost damage |
Move
most houseplants and tender tropicals inside before the first frost, when
temperatures start falling into the low 40’s at night. There are some plants that are considered
half-hardy perennials, like the horticultural geranium (pelargonium). They will survive light frosts, the leaves
may redden a bit, and keep blooming until a hard freeze. You’ll want to bring them in before then if
you want to save them. Other perennials
you may over winter inside because they aren’t quite hardy in your area don’t
mind being out a bit longer and shrug off light frost. In my case this is rosemary. I leave it
outside until the ground is frozen the first time.
In the
vegetable garden tomatoes, peppers, eggplant, beans, melons and cucumbers will
be killed by frost. Cabbage, lettuce,
kale, carrots, beets, will be fine through light frosts but should be harvested
before a hard freeze. You can throw an
old sheet or some floating row cover over your tender plants if you want to
prolong the harvest just a little longer.
This may be helpful if first frost is predicted earlier than
normal. If it’s late in the season it’s
probably best to harvest what you can and let the plants die.
You can
leave bulbs you store inside over winter, like dahlias, canna’s and gladiolus,
outside until frost has killed the foliage but dig them before the soil
freezes. Tender bulbs in pots can be
left until the foliage dies but bring the pots inside before they freeze solid.
Things like pumpkins, gourds, and popcorn can be harvested after a frost, but
pumpkins and gourds shouldn’t be allowed to freeze.
If you
want to prolong the bloom of annuals or tender perennials like marigolds,
petunias, impatiens, cosmos, and so on, you can cover them when the first frost
is predicted. Use a light weight cloth
or spun row cover material, not plastic.
(I use old sheets.) You must remove the covering early in the morning
before the sun heats things up very much.
This is best done when there’s an early frost and many more warm days
are ahead, or you got caught off guard and don’t have time to move plants
inside. You can’t protect plants forever
this way and it won’t protect them if the temps fall into the mid 20’s or
below.
There
are some annuals and tender perennials grown as annuals that will survive quite
a bit of cold. This includes violas and
pansies, some salvias, diascia, wax begonias, and calendula. Let them bloom until they die. I have had the occasional petunia bloom until
Thanksgiving here also.
Plants you can save for next year
I also
have to mention here that some tender ( non- hardy) perennials people think of
as annuals can make good houseplants if brought inside or at least will survive
until you put them out again the following year. This includes polka pot plant, Setcreasea
pallida 'Purple Heart', “spikes” (various dracaena species), sweet potato
vines, the small flowered fuchsias, the geraniums (pelargonium), many of the
various ivies used as pot “spillers”, coleus, fibrous rooted and cane begonias,
rex begonias, Joseph’s coat (Alternathera ficoidea), lantana, aloes and agaves,
Cuphea (cigar plant), eucalyptus,
Chinese (tropical)hibiscus, abutilon, bougainvillea, mandevilla, gardenia and
lofos.
Don’t
bring numerous plants of the same species inside unless you have tons of
room. You can start cuttings from the
ones you save in the spring. You could
also take cuttings of many of these in the fall and keep them inside as small
plants.
If you
live in zone 6 or below you may want to bring any rosemary plants you have
inside once freezing conditions arrive but keep them in a cool room. Lemon verbena and lemon grass can also be
wintered inside. While tomatoes and
peppers are tender perennials unless you have a greenhouse or a special grow
area with intense artificial light don’t try to bring them inside.
True
annuals such as zinnias, marigolds, cosmos and so on might bloom inside for a
few weeks but they will soon die. Cold hardy perennials like hosta, echinacea,
phlox and so on need a cold dormant period and won’t do well when brought
inside. Save your indoor space for
perennial plants that can handle inside conditions.
So here’s
the timeline-houseplants and tropicals before the first frost, when nights are
getting into the 40’s, right before the first frost or after a light frost
bring in tender perennials you’ll be saving, then bring in those almost hardy in
your zone perennials before a hard freeze along with pots of bulbs gone dormant
and dig up tender bulbs in the ground for storage. Six months or so inside and we’ll be moving
it all back outside.
Collecting and
storing seeds
As the
gardener strolls through the garden in late summer and fall he or she may
notice a lot of seed pods hanging on various garden plants, maybe on some
plants you never dreamed you could start from seeds. Wilderness hikers and
people touring public gardens may also notice various seeds that they would
like to collect. Use some sense in these
instances, many parks prohibit removing any plant material, and you should ask
permission from someone in charge of a public garden before collecting seeds. Gardeners want to help plant babies
grow. But collecting the seeds won’t
help you grow new plants if you don’t know when to collect the seeds and how to
store them.
Before
you begin collecting seeds from common garden plants remember that many plants
we grow in gardens today are hybrids.
The seeds you collect from hybrid plants will produce plants that probably
will not look like the parent plant. They may be excellent producers or have
beautiful flowers or they may not be the best looking or producing plants. Even if you planted several varieties of
purebred “open pollinated” plants in the garden they may have cross pollinated
and the seeds won’t produce plants like the parent you collected them from. It’s
a gamble.
Many
times when seed from hybrid plants is collected and grown the next generation
tends to revert to the wild or most common form of the plant. Morning glories and phlox are two species
that come to mind. This reversion tends
to get greater with each generation of seeds collected and grown. You may have planted Heavenly Blue morning
glories this year and collected their seeds.
Even if you only had Heavenly Blue morning glories in your garden the
seeds will produce some plants that have blue flowers but also some with other
colors, most often the purple of the wild morning glory. When you collect seeds the second year the
third years plants will have even fewer blue flowers.
This
doesn’t mean you won’t want to try collecting and growing seeds from hybrid
varieties. Sometimes you may get some truly
interesting or beautiful plants from those collected seeds.
Make sure they are ready
In most
cases you want to collect the seed when the seed pod or fruit surrounding the
seeds is fully ripe. Since we eat some
fruits before they are fully ripe, like cucumbers, you must know what a ripe
fruit looks like for that plant and wait to harvest the seeds. A ripe cucumber
is all yellow. Corn should turn dry and
hard on the stalk before saving seeds.
Melons should be mushy ripe and the seeds black or dark brown for
watermelon before harvest. Peppers must
be fully ripe- and they can be many colors when ripe- and soft. Tomatoes must be ripe to the rotting point. Most flower seed pods or seed heads turn brown
and dry when the seeds are ready to harvest. The opening of pods means the
seeds are ripe.
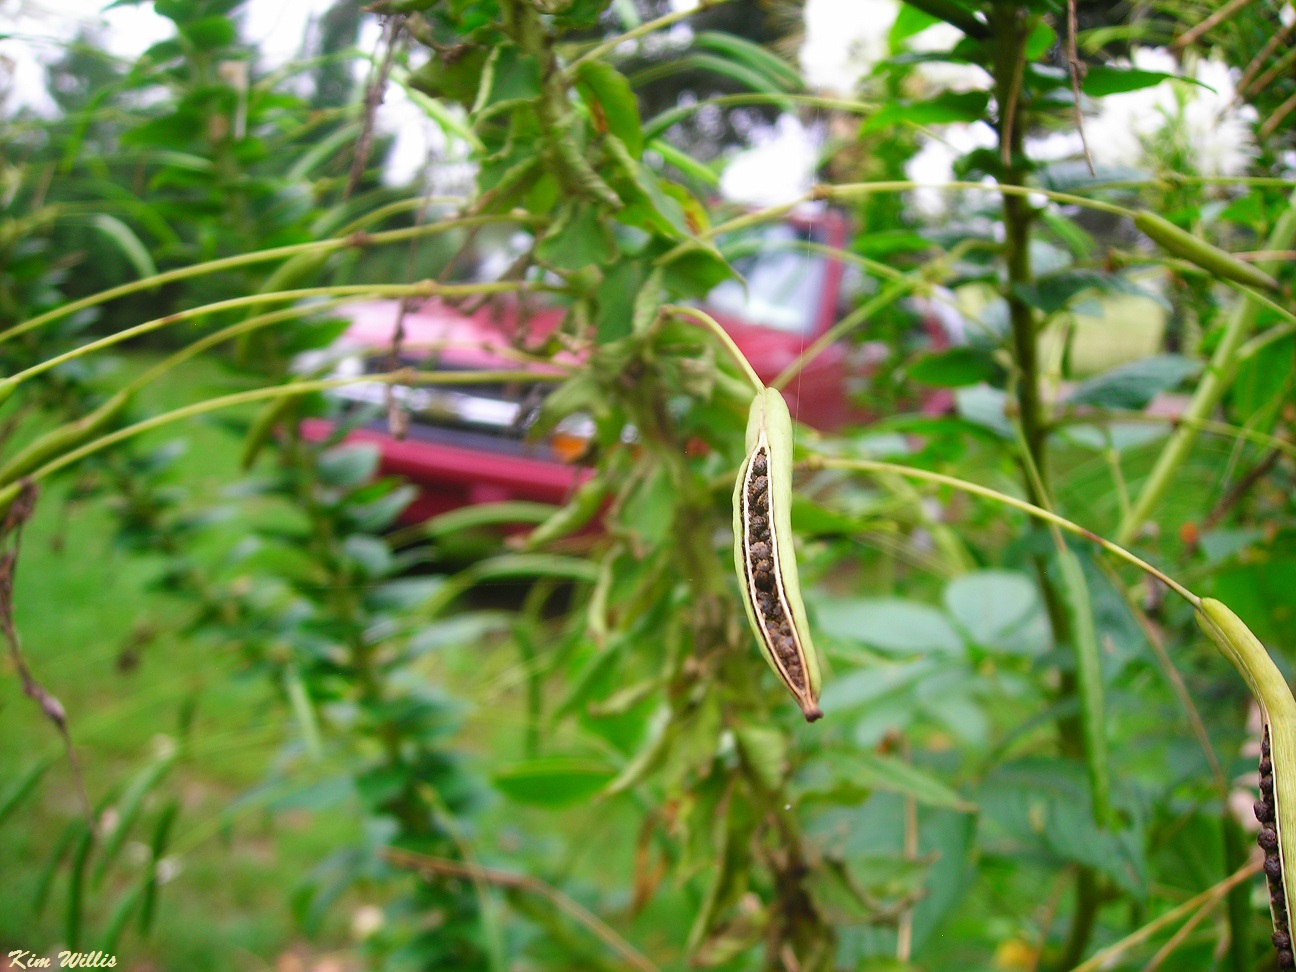 |
| Cleome seed pod splitting |
Collect
seeds on a warm, sunny dry day if at all possible. It’s best to collect most types of seed
before a heavy frost or freeze but collection after that can still work for
many seeds. The trick in collecting seed
pods and seedheads to get the seeds is to not let them split or otherwise
disperse the seeds before you collect them, but have them still be mature. Keep a close eye on ripening pods and
seedheads. On a warm day a closed pod in
the morning may have shot off the seeds or dropped them on the ground by
evening. If seed pods and seedheads are almost dry and nearly ready to harvest
you can cut them and put them in paper bags in a warm dry place to finish
drying. Separate the varieties and
species because they may drop the seeds.
Label your bags! Or you can surround seed heads or pods with paper bags
and tie them right on the living plant.
Sometimes
gardeners have a hard time distinguishing the actual seeds from the seed pods,
or remnants of flowers and fruit. Put
the ripe seed heads or pods in paper bags, close and shake them. You may see loose seeds in the bottom. In most cases a ripe pod or seed head will
split or otherwise open or drop its seeds, but in some cases even ripe pods
must be opened. If you can’t decide if it’s a pod or an individual seed try
opening one. Some flowers like Echinacea, rudbeckia, zinnia and others with
daisy like flowers will have a bit of dried petal attached to the seed. Even
when dry some of these flower heads must be pulled apart to separate the seeds.
Sometimes fruit needs to rot
In some
cases for seeds to be properly stored and then sprout, the fruit must first rot
or ferment. While you can cut open a
very ripe tomato and extract the seeds for storage, it’s better to let the
tomato turn to a rotting, fermenting mush before separating out the seeds,
drying them and saving them. Germination
rates will be higher. Rotting fruit
keeps seeds moist for a while. And
chemicals caused by the decomposition process may be necessary in some cases to
soften the seed coat.
Many
seeds are prepared for germination in nature by passing through some animal’s
digestion system. You can ferment or rot
fruits in a nicer way though. Simply
place a ripe fruit in an open container and let it sit for a while. You can cut the fruit in pieces if you want. Tomatoes,
eggplant, grapes, berries, summer squash and cucumbers benefit from letting fruit
rot and ferment before saving the seed. Label the container if you have several
varieties of something like tomatoes to ferment. You’ll want to put the containers somewhere
where you don’t smell them and the flies they attract won’t bother you. Make sure animals can’t eat them.
Let the
fruit rot until it’s a watery, smelly unrecognizable mass. Then put the contents in a fine wire mesh
strainer and gently rinse with clean water until clean seeds are left in the
strainer. Spread the seeds on a piece of
screen and let them dry in a warm, dark place until they look and feel
thoroughly dry before storing. If you
spread the seeds on newspaper or paper towels they often stick to the paper as
they dry and can be hard to remove.
 |
| Ligularia seeds |
Storing seeds
When you
do have the seeds separated from pods and fruit let them dry for a few more
days in a warm dark location. Almost all
garden seeds need to be thoroughly dry before storing them so they don’t mold
or rot. Clean out pieces of stem, pod
and other debris before storing. It’s
best to place seeds in paper packages, even a twist of tissue or fold of
newspaper, before placing them in sealed glass or plastic containers. (A tip-
cut junk mail up into small rectangles, fold them in half and tape the sides
shut. Fill with seeds and tape the top
shut. ) Paper absorbs moisture. You can
add a bit of powdered milk wrapped in tissue to each container to absorb
moisture too. Once again- label
containers and packets, there’s nothing worse than forgetting what kinds of
seeds you carefully saved. And I tell
you that from experience.
After
your seeds are packaged store the seeds of most common garden plants in the
refrigerator crisper drawer or another cool, dry dark spot. Most plants grown in temperate climates, both
annuals and perennials, need a period of cold dormancy before they
germinate. Even if they don’t they will
store better in a cool location. Some
tropical plant seeds may do better in warmer storage and some seeds may
actually need freezing temperatures to properly prepare them for germination. A few types of seed need to be stored
moist. If you are saving some unusual
seeds you may want to research how to store them.
There
are some seeds that should be planted soon after you collect them. If they are cold hardy you can plant them
outside. Otherwise plant them in pots inside.
The sooner they are planted the better germination will be. These plants
include:
Anthurium,
Asparagus species, Clivia, perennial Delphinium, Geranium (Pelargonium),
Gerbera, Ginkgo, Impatiens, Kochia, Oriental lilies, Philodendron, Magnolia,
onions, Passiflora, Potentilla, Salvia splendens, Tanecetum coccinium (or
Pyrethrum).
Hosta
and most types of lily seed other than Oriental have better germination if
sowed as soon as collected but can be stored until late winter and started inside.
They should be kept in cold storage- refrigerator-
until planted.
So have
fun- get out there and gather those seeds.
You can trade with other gardeners for things you don’t have.
Peace Lily
Do you want a houseplant that will bloom without a
sunny window? Or a tropical looking
plant for the shady porch or patio? Why
not try a Peace lily? Spathiphyllum
species are not true lilies and have been used as houseplants for hundreds of
years. (A common name is spath lily). Peace lilies are great indoor air
cleaners, removing harmful particulates from indoor air. And best of all peace lilies are fairly easy
to grow and are a great plant for beginning indoor gardeners. They also make great patio container plants
in the summer in shady areas.

There are some 40 species of peace lilies, they are
native to South America, and southern Asia, and many are in cultivation. They range in size from about a foot tall to
over 6 feet tall at maturity. Two small
varieties are ‘Sonia’ and ‘Little Angel’.
‘Domino’ and ‘White Stripe’ have leaves variegated with white. One of the largest varieties of peace lily is
‘Sensation’ which often gets 6 feet tall and has huge leaves. Most plants gardeners will find in stores
will be simply marked “peace lily”. They
have green leaves, white flowers and get 3-4 feet tall.
Gardeners will want to start with a peace lily
plant. You’ll see seeds advertised, but
peace lilies are hard to start from seed, slow growing and take years to bloom
from seed. Plants are propagated by
division for quick growth and bloom.
The large, glossy green leaves of Peace lilies appear
to rise right from the soil, there is no noticeable main stem. This nice, glossy foliage is one of the best
attributes of the peace lily, whether it’s one sitting on your desk or filling
a shady spot on the deck. There are a
few varieties with white variegation in the foliage.
In spring and into summer peace lilies that are happy
and healthy will have numerous white blooms similar to a calla lily bloom. There is a rod shaped, white bumpy true
flower surrounded by a big white bract, which most people see as a flower. Large plants will bloom for 2 months or more,
with several flowers blooming at a time.
When the flowers turn greenish, with browning edges cut the flowering
stalk off. The flowers are interesting
but the plants foliage is pretty all year around.
What
Peace lilies need
Peace lilies like bright, indirect light. They can be several feet from a west or south
window, by a north or east window or even do well in brightly lit rooms without
windows. If many leaves are turning yellow or looking browned on the edges or
the leaves look bleached out the light level is too high. Don’t let leaves touch cold windows. When moved outside peace lilies must be kept
in a shaded area, direct sun will quickly kill them. My peace lily sits outside in the summer
under a cedar tree, with sunlight only filtering through late in the day. It absolutely loves it there and blooms all
summer.
Peace lilies want temperatures about the same range as
humans like, 65-85 degrees, with no cold drafts. They will not survive temperatures that go
below 45 degrees so wait before bringing them outside in the spring until it
has warmed up and bring them back in before temperatures drop too much in the
fall. When they are outside keep Peace
lilies protected from the wind. Of course they will gladly stay inside all year
round if they are not situated over an air conditioning vent.
Peace lilies have one special requirement, moisture-
they need a fairly high humidity level and even soil moisture. Keeping them in groups of other plants,
giving them a shower once in a while, or using a humidifier in the home will
help keep them glossy and happy. Plants
like growing by aquariums or water features also. They are excellent plants for brightly lit
bathrooms and laundry rooms.
Water the Peace lily as soon as the pot gets just a
little dry, but before it wilts. When you do water, soak the pot well and let
it drain from the bottom. Wilted plants
will generally recover when watered but don’t allow this to happen too often as
it stresses the plant. Using rain water,
untreated well water or distilled water is better than chemically treated city
water for all plants.
Use fertilizer sparingly on Peace lilies; start
fertilizing in late winter using a flowering houseplant fertilizer mixed
according to directions at every other watering. Stop fertilizing in mid-summer. Some growers claim Peace lilies are sensitive
to artificial fertilizers and use only natural fertilizers like fish
emulsion. But others say it doesn’t make
much difference what type of fertilizer
you use. I use a commercial fertilizer
that I use on all my houseplants and my peace lily thrives on it.
Peace lilies don’t require a lot of pruning or
shaping. Trim off any dead leaves or
flowers. Re-pot the plant only when it
is so root bound that it needs very frequent watering or is splitting the
pot. They don’t mind crowded roots and
bloom better when a little pot bound. Use any light weight potting medium when you
re-pot. Aphids are occasional problems
for indoor peace lilies. You can treat
them with an insecticidal soap spray or houseplant insecticide.
Peace lilies are mildly toxic to pets, keep pets from
eating them (and the kids too). They
contain oxalate crystals which will cause a burning sensation in the mouth so
pets rarely consume enough to be harmed.
If they did continue eating them they would begin vomiting long before
they ate a toxic amount.
With a name like peace lily everyone needs one of these
beauties in their home. Maybe we should
place them all over the senate and congress floors too.
Tailgate
Apple cake
Let me make this clear- I don’t do tailgate parties.
But this apple cake would be excellent for one or for a potluck or just a great
dessert. I make this a couple of times
in the fall when apples are plentiful.
It’s a good way to use apples that aren’t perfect too.
Ingredients

6 cups of peeled and sliced apples
4 tablespoons of butter
1 cup of brown sugar, packed
1 spice cake mix
3 large eggs
1/3 cup oil or
melted butter
½ cup water
1 jar of caramel ice cream topping
Directions
Melt the butter in a large skillet, add the brown sugar
and apple slices, cover pan and cook on low heat until the apple slices are
tender, about 5 minutes. Stir the
cooking apples frequently.
Spray the bottom and sides of a 9 x 13 cake pan with
cooking spray. Instead of spraying a pan
it could be lined with non-stick foil for an easy clean up.
When the apples are tender, pour skillet contents in
the cake pan and spread them evenly over the bottom of the cake pan.
Mix together the cake mix, eggs, oil and water. Pour the mix over the apples in the pan. Bake the cake at 350 degrees until a knife
inserted in the middle comes out clean- 30-40 minutes.
Let the cake cool about 5 minutes then poke holes
evenly across the surface with the handle of a wooden spoon, skewer or similar
item. Pour the caramel ice cream
topping over the cake evenly, it will be absorbed by the cake.
This cake is great served warm with cool whip or ice
cream. It also freezes well.
Soak
up that sun; let your body store the goodness for winter
Kim Willis
“He who has a garden and
a library wants for nothing” ― Cicero
© Kim Willis - no parts of this newsletter may be used
without permission.
And
So On….
Do you have plants or seeds you would like to swap or share? Post them here by emailing me. You can also
ask me to post garden related events. Kimwillis151@gmail.com
Find
Michigan garden events/classes here:
(This is the Lapeer County Gardeners
facebook page)
An
interesting Plant Id page you can join on Facebook
Here’s a
seed/plant sharing group you can join on Facebook
Newsletter/blog
information
If you would like to
pass along a notice about an educational event or a volunteer opportunity
please send me an email before Tuesday of each week and I will print it. Also
if you have a comment or opinion you’d like to share, send it to me or you can
comment directly on the blog. Please state that you want to have the item
published in my weekly note if you email me. You must give your full name and
what you say must be polite and not attack any individual. I am very open to
ideas and opinions that don’t match mine but I do reserve the right to publish
what I want. Contact me at KimWillis151@gmail.com
I write this because I
love to share with other gardeners some of the things I come across in my
research each week. It keeps me engaged with people and horticulture. It’s a
hobby, basically. I hope you enjoy it. If you are on my mailing list and at any
time you don’t wish to receive these emails just let me know. If you know
anyone who would like to receive a notification by email when a new blog is
published have them send their email address to me. KimWillis151@gmail.com
No comments:
Post a Comment