Tuesday, September 8, 2020

September 8, 2020 Butterfly plugs and pepper jelly

Hi Gardeners

It’s a rainy day here and I’m not complaining. We had some good thunderstorms yesterday too. The plants all like the moisture and the nitrogen boost. But the cool nights- we got down to 44 degrees this weekend- have me really thinking about moving the plants inside.


Thirty years ago, when I lived 50 miles south of here, I would have been moving plants inside on the week of Labor Day, and frost wouldn’t be far behind. I can really see climate change as now I don’t move plants inside until much later. Our average first frost is October 3, I believe. I guess that’s proof of climate warming.

But I will be keeping a close eye on the weather forecast. You never know when a sneaky frost will pop up.  I try to look ahead so I have at least a few days to get things inside. Ideally house plants should be moved inside when nights regularly get below 50 degrees. A stray night here and there of chilly temps doesn’t hurt too much but if the true cold is setting in, its time.

I am thinking the first frost here will come around the time of the next full moon- which is October 1. It’s been my observation that the first and last frosts usually coincide with a full moon. It’s probably not scientific and I’ll be carefully watching the forecast but it’s a signpost.

 I am a plant hoarder

I’ve been watching some episodes of Hoarder on TV.  And it made me realize- I’m a plant hoarder, I freely admit it. I try to make logic my guide but somehow, I still can’t bear to let plants go. I know I can buy those plants again next spring at very reasonable costs if I just let winter take them. But I think of the money I’ll save and how beautiful those plants will look inside- at least for a while- and find myself carrying them inside.

I’m looking at some huge sweet potato plants and thinking what a shame it will be if I let the frost have them. I’m talking 3 feet wide and 2 feet tall sweet potato plants. They do overwinter if you have bright light.  And I added 4 fuchsia plants to the garden this year, rarer varieties, and I know they will also overwinter and bloom cheerfully all winter.

Then there are all the violet stemmed taro plants I have- they got huge this year. I’m talking 5 feet high with leaves 2 feet long.  I started with 1 plant 3 years ago and then divided them. There’s a huge elephant ear plant too.

There are new geraniums to add to the inside collection this year too. And the ginger plants have grown substantially over summer. There are more tuberous begonias- but I can let them go dormant and store them. And the coleus- the plants are gorgeous – and large- this year. Some people let them die or just take cuttings, but I have a hard, hard time doing that.

Of course there’s the regular slate of house plants, hibiscus trees, Norfolk pine, peace lily, palms, succulents of various sorts, a dozen Christmas cacti, streptocarpus, spider plants, variegated ficus, pomegranate, lemon and orange trees, lady of the night, jasmines, African violets, pothos and philodendron and assorted other things. Some are summering outside, some got left inside this year.

Some plants are stored on the back porch, those that go dormant after a while or those that handle cold well (the porch isn’t heated but doesn’t get below freezing). It’s always packed with geraniums, tuberous begonias, canna, and pots of bulbs like peacock lilies, crocosmia, ground orchid, pineapple lily and so on.

My husband just rolls his eyes as I agonize over what to save and what to leave. He doesn’t complain about the living room (and every other room), being filled with plants and grow lights sending the electric meter spinning, as long as he can see the TV.  At least he isn’t looking at piles of cereal boxes and old dolls. He’s threading his way through a jungle and trying to find the tree frog singing away.

I know I need a heated greenhouse. I’ve thought about it many times, weighed the cost and work involved. But I know that would encourage me to buy more plants- I’d love to have more hibiscus for example. I think it might make my addiction worse. And it would never be big enough.

I have faced my addiction and I have decided to sell off a few of the larger plants this fall. The jasmines are going and at least one hibiscus.  Probably a taro or two. Maybe some smaller things too. I’ll make the decisions this week and I will post what I’m wanting to sell on the Lapeer County Gardeners FB page. It will be all local sales and prices will be low.


This week I have decided to post some short articles on new research I have read about.  I’ve been catching up my reading of saved science articles.


What are you eating?

If you are an older person there has been a lot of research lately on what type of diet is healthiest for you. Here’s some of the results from the many studies published recently.

A low carb, high fat, moderate protein diet was found to be helpful when people over 50 need to lose weight. Yes, high fat. Research has proven it’s not dietary fat but carbs that cause weight gain. Research published from researchers with the University of Alabama in the journal Nutrition and Metabolism, in August 2020 found older adults were healthier and lost weight without effort when they followed such a diet.

The people in the study were asked to eat 3 whole eggs a day. (They also ate other protein sources.) Eggs are a great source of protein, choline, B12, selenium, vitamin D and healthy fat. A study presented at The Physiological Society's conference on Future Physiology, July 2020 also found that animal sources of protein were better than soy-based protein at preserving muscle mass.

And another study published in March found that older people maintained muscle mass better if they spread their protein intake equally over all 3 meals. Rather than having just toast for breakfast you would be better off to eat scrambled eggs, and maybe have a hardboiled egg in a lunch salad or some other form of good protein, along with protein for dinner.

Being a vegetarian may be healthier for some people, but not unless you eat the right plant-based foods. Research presented at the European Society of Cardiology last week found that people whose vegetarian diet contained highly processed carbs, things made from white flour for example, sweet desserts, potatoes, white rice, fruit juices and smoothies, were not healthier overall than people on a meat based diet who avoided refined carbs.

If you are having trouble with allergies that cause you to have skin rashes and hives, you may want to start eating black raspberries. A study from Ohio State University found that a serving of black raspberries daily reduced skin inflammation in animals caused by allergic reactions.  They also found that black raspberries may reduce inflammation in conditions like cancer. So next time you get poison ivy try munching some black raspberries.


More reading

www.sciencedaily.com/releases/2020/07/200702113718.htm

www.sciencedaily.com/releases/2020/03/200316104012.htm

www.sciencedaily.com/releases/2020/08/200820151337.htm

www.sciencedaily.com/releases/2020/08/200827101841.htm

www.sciencedaily.com/releases/2020/07/200707113329.htm


Butterflies and Bees


Butterflies can put a plug in it, researchers found. In some species of butterflies, the males insert a waxy plug in the female after they mate with her. This is to prevent other butterflies from mating with her. But researchers found that in some cases the females or maybe other males, removed the plugs or damaged them.

It is helpful to maintaining the male’s genetics when he can insert a plug and keep out competitor’s sperm. But it is an advantage for the female butterfly to mate with more than one male because different males may have better genes for the survival of offspring. Hence the battle of the sexes.

Mating plugs are known as sphragis and range from simple jelly like blobs to elaborate structures with barbs, hooks, and wings.  Does it make you want to examine a butterfly behind?

Bumble bees are bigger in the city research has found. The bigger bees have bigger brains, better sight and are better at finding food and navigating. They are less likely to be killed by predators. Bigger bees also pollinate more flowers. The researchers studied 3 species of bumblebees, the red-tailed bumblebee (Bombus lapidarius), the common carder bee (Bombus pascuorum) and the buff-tailed bumblebee (Bombus terrestris). All were bigger in cities.

The theory of why bumble bees in city areas are bigger than their rural counterparts is based on natural selection. Bees in the city have to fly farther to get enough food and they have to navigate more difficult terrain and evade many more dangers than rural bees. The ones that survive such feats pass along their genes and improve the bees living in cities. Cities are also warmer than rural areas, which may also help improve bee size.


More reading

www.sciencedaily.com/releases/2020/09/200903155503.htm

www.sciencedaily.com/releases/2020/08/200817104339.htm


Neonicotinoid problems


Neonicotinoids are a class of pesticides that are being used widely in our environment now, from flea and tick killing on pets and livestock, to protecting crops and trees from insect pests. These pesticides are nondiscriminatory- meaning they affect all types of insects. It has been known for a while that they negatively affect pollinators and other helpful insects.  Now researchers are worried they may affect animals further up the food chain, like birds and frogs.

Recently traces of neonicotinoids were found in honeydew, the secretions that aphids and scale insects give off, on plants grown from seeds treated with the pesticides before planting. Researchers from North Carolina State University and Pennsylvania State University are urging that seed treatments be banned. They pled their case in the journal of Proceedings of the National Academy of Sciences.

The researchers feel that treating seeds with neonicotinoids only results in a 5 % better yield in crops. They feel that banning this use won’t substantially harm crop yields and would be an easy way to get more neonicotinoids out of the food chain.

More reading

www.sciencedaily.com/releases/2020/09/200902182423.htm

 Proceedings of the National Academy of Sciences, 2020; 202017221 DOI: 10.1073/pnas.2017221117


New England Aster 


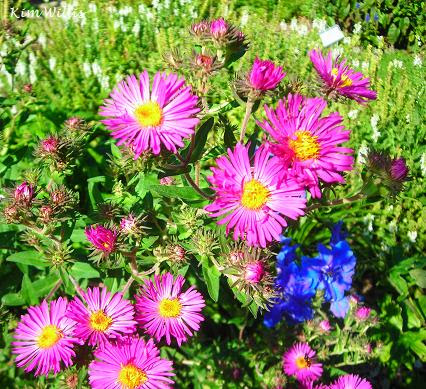
New England Aster, (Aster novae-angliae), spreads it’s pretty purple flowers along sunny roadsides and in fields in late summer and fall. It often grows in the same areas as Goldenrod, producing a stunning color combination gardeners often imitate. In fact, cultivars of both plants are available for gardeners to use in gardens for fall color.


New England asters are perennial plants that die to the ground each winter.  The stems are stiff and hairy and feel sticky to the touch. The long dark green leaves seem to clasp the stems at their base. The plants grow to 5 or more feet in ideal conditions but generally range from 2-3 feet high.

New England Asters have clusters of small purple, daisy-like flowers with yellow centers.  The flowers range from 1-2 inches wide depending on growing conditions and individual plant characteristics. They start blooming in late August and continue until a hard frost. They prefer sunny, moist areas.

New England Asters are excellent plants for native plant gardens and even for more conventional gardens to bring late fall color. They also make good cut flowers.


Time to harvest sage


If you are growing culinary sage in your garden now is the time to harvest it.  The plants should have about 6 weeks before a hard freeze to harden off after pruning and if we are lucky you can still squeak in a good harvest without compromising plant health.  You’ll want some sage for that Thanksgiving turkey so don’t delay.  Sage is also great when used fresh; it has lighter, more lemony notes.

You can dry sage by harvesting fresh stems with leaves and hanging them in a warm, dark place, or in a dehydrator, microwave or oven.  Make sure the sage is completely dried, it may take longer than thin leaved herbs, before storing, or it may mold and taste musty.  Store completely dried leaves in a clean glass container in a cool place. Sage leaves can also be frozen in water and will taste more like fresh sage when used than dried sage.

I throw sprigs of sage in a plastic freezer bag and pop them in the freezer without drying them. I take a bit out when I need it and crumble it while it’s frozen.  It tastes more like fresh sage than dried when used like this.

Be careful that when purchasing sage you intend to use for cooking, that you are not getting a purely ornamental variety, such as Pineapple sage or Honey Melon sage.  These are grown for their flowers and scented leaves but have little medicinal or cooking value. Bergarten, Holt’s Mammoth, Extrakta and White Dalmation are all good culinary sages. 

In zone 5 and lower, some winter protection for sage is advised, especially if the sage plant is in an exposed area. You can mound soil around the base or use a large tomato cage around the plant and wrap it in burlap.  It is normal for sage to retain its leaves well into winter, if not through it, but the plants do get rather ratty looking before spring.  In the spring, trim off any winter killed branches and lightly fertilize.  After 4 or 5 years you will probably need to replace your sage plant, as it is considered a short-lived perennial.


Pepper Jelly

Yes, you can make jelly from peppers!  It’s not sweet though you do use sugar. Pepper jelly is used in savory dishes and is sometimes put on relish or condiment trays.

You’ll need a food processor and a water bath canner plus you’ll need liquid pectin, which you can buy where canning supplies are sold.  You’ll need some ½ pint or jelly jars and lids too. This recipe will make about 5 jars.

You can vary the peppers you use in this recipe. Usually a mixture of hot and sweet peppers is used.  Pepper colors will determine the color of your jelly. You can add food coloring if you don’t like the color of your jelly.


8-10 peppers, depending on size

1 cup white vinegar

5 cups sugar

1 pouch (3 oz.) liquid pectin


Sterilize your jars and keep them hot.  Wash and core the peppers, remove seeds and cut into small pieces.

Place pepper pieces and vinegar into food processor and blend until liquefied. You will probably have to do this in batches, dividing peppers and vinegar evenly.

Place the liquid peppers and sugar in a large pot.  Boil slowly for 10 minutes.

Add the liquid pectin and boil 1 minute longer. Skim off any foam that forms.

Pour hot jelly into hot jars, leaving a ¼ inch of space to the rim.  Wipe rims and add lids.

Process 5 minutes in a boiling water canner.

Cool, check for a seal, label and store.


"In the garden, Autumn is, indeed the crowning glory of the year, bringing us the fruition of months of thought and care and toil.
And at no season, safe perhaps in Daffodil time, do we get such superb  colour effects as from August to November."

-   Rose G. Kingsley, The Autumn Garden, 1905


 Kim Willis

All parts of this blog are copyrighted and may not be used without permission.


And So On….


Find Michigan garden events/classes here:

https://www.facebook.com/groups/118847598146598/

(This is the Lapeer County Gardeners facebook page)


Newsletter/blog information


If you have a comment or opinion you’d like to share, send it to me or you can comment directly on the blog. Please state that you want to have the item published in my weekly blog if you email me. You must give your full name and what you say must be polite and not attack any individual. I am very open to ideas and opinions that don’t match mine, but I do reserve the right to publish what I want.

If you are on an email list for this blog and wish to be removed please contact me.

Contact me at KimWillis151@gmail.com


Tuesday, September 1, 2020

September 1, 2020, Salsa Season

 Hi gardeners

I asked for a rain dance last week and some of you must have done it. I got some very good rains on Wednesday and Thursday of last week, and we are supposed to get more tonight and tomorrow.  The garden thanks you.


Can you believe it’s September?  Meteorologists count September as a fall month, although technically fall starts with the fall equinox on the 22nd.  If you are outside in the evening you definitely know the days are getting shorter. The plants know it too, the first seeping in of oranges, reds and purples has begun.

I am disappointed that my white anemone is not going to give me a good show this year. Usually it’s about 3 feet high and loaded with flowers, but this year either the late cold in the spring or something eating on it damaged the growing stems. I have a basal clump of foliage but the stems that did emerge are blackened and bare at the tips. A new pink anemone I planted this year does have buds, but the plant is only about 6 inches high.

I do have some dahlias that are just now beginning to bloom in the front beds that should help extend the color a bit longer. Autumn Joy sedum is starting to bloom. Toad lilies will bloom soon.  And the hardy hibiscus are doing their best to add color. Still in bloom are black eyed susan’s, one prolific purple daylily, mums, ligularia, hosta, and of course the annuals.

I was outside weeding last evening, and I was cutting back the browning ferns in the front bed. Ostrich ferns are lovely in the spring and summer although they do take over a bed. In the late summer and fall though they get crappy looking, especially when its dry. And they hide things, like the hydrangea plant I discovered when I cut some back.

I don’t remember planting a hydrangea in that spot.  I checked my records and nope, no mention of hydrangea. It’s a pretty large clump, doesn’t look like a seedling. Nice foliage about a foot high. The only thing I can think of is that I moved it from somewhere last fall but wracking my brain I can’t think of where that would have been.  So, a nice mystery. I am going to mark it and make sure it doesn’t get overwhelmed by ferns next year and maybe I’ll get blooms.

I am starting to look at the houseplants that went out for a summer vacation and wonder where I am going to put them all, now that most have grown a lot, when I bring them back in. I think I may have to thin out the ranks again this year.  I did buy a new growlight, a three-armed LED thing to replace some of my cobbled together contraptions. (There are lots of garden bargains right now, keep your eyes open.)  But there is only so much room in this tiny house.

I hope everyone has a good Labor Day holiday, but remember- social distance, wear a mask, and stay safe.


New information about powdery mildew on plants

Powdery mildew is a common fungal disease infecting many types of garden plants. It makes plants look bad and diminishes their vigor but seldom kills plants outright. Many people decide to ignore the fungal disease and hope plants will recover.  Fungal diseases can’t be cured once they start anyway.

But we may want to start rethinking how we treat plants with powdery mildew. There are numerous strains of powdery mildew. Some start early in the season, others later. Some infect one species of plants, some infect many. Plants can get more than one infection of the fungus. New findings published in the Aug. 31 issue of Nature Ecology & Evolution found that how we treat the first symptoms of powdery mildew may affect how healthy the plant will continue to be.

Plants that got powdery mildew early in the season were more likely to get another infection later in the season.  Researchers found that rather than the disease providing immunity to later infections, one infection makes plants more susceptible to other strains of powdery mildew. And some strains of powdery mildew are more likely to weaken the plants defenses if they occur first in the season.

Of course, any plant that’s weakened by disease might have trouble fending off the next assault. But it seems that in powdery mildew at least, early strains of the disease may actually facilitate later infections.

The takeaway here is that if gardeners want healthy plants, they may want to prevent fungal infections from happening. This can be by preventative sprays for susceptible plants, by providing good airflow in the garden and proper watering practices, and by planting varieties with resistance to powdery mildew. Preventing early infection may keep plants healthy later in the season.

Read more here

www.sciencedaily.com/releases/2020/08/200831112349.htm


September almanac

This month the various Farmers Almanacs come out for 2021. (There’s the Old Farmer’s almanac and Farmer’s Almanac.)  September is a month of transition, from summer to fall, back to school, back to sweatshirts and sweaters. Most gardeners will want to think about bringing in the houseplants, if they summered outside.

The Corn (full) moon occurs this month on September 4th. If it’s the closest full moon to the autumn equinox it’s also called the Harvest moon. This year the title of Harvest moon goes to the full moon on October 1.  Moon perigee is the 18th and apogee is the 6th.  Isn’t it funny that despite how “advanced we have become that people still track the phases of the moon? They are on most calendars, at least the full, new and quarter moons.

The autumn equinox, the start of fall is September 22nd.  We’ll be down to 12 hours of daylight then, give or take 8 minutes, depending on where you are.  On this day the sun sets exactly due west and rises due east of your home.  Go outside and position a marker or note it on a landmark and you will always know the true directions around your home.

September in my area is when the hummingbirds and orioles generally leave along with some other songbirds, for their winter hibernation areas. Many hawks will also be migrating south, they fly at night, so the flocks are rarely seen.  Some say woodchucks go into hibernation this month but here if it’s warm they will be out feeding through October.

The birth flower for September is the aster or in some places, the morning glory.  Asters are said to symbolize powerful love and morning glories just affection so choose the flower you give this month accordingly.  The September birthstone is sapphire.


September is Hispanic Heritage Month, National Chicken month, Honey month, Classical Music month, National Preparedness month, and International Square-Dancing month.

Besides Labor Day (7th ) holidays in September include Patriots day on the 11th, Grandparents day the 13th (who honors us grandparents anyway?) and the 13th is National Peanut day, the 14th is Pet Memorial Day, the 19th is National POW-MIA day, 21st is International Peace Day, the 26th is Native American Day and the 28th is both Good Neighbor Day and Ask a Stupid Question day. 


September garden chores

Clean up any veggie garden crops you have finished harvesting. Remove foliage and any fruits left to the compost pile to avoid overwintering pests and diseases in the garden.

Dig potatoes if the vines have died. Let them cure spread out in a shady spot outside for 24 hours before storing.

Harvest and prepare apples, grapes and other fruit for storage.

Start removing sod and weeds for any new gardens you plan to add next year. Fall prep gives you a head start.

Order spring blooming bulbs for later fall planting. Plant lily bulbs as soon as you receive them.

If any houseplants, whether presently outside or inside, need repotting, now is the time to do so. Treat houseplants with a systemic pesticide like Bonide before you bring them inside. This will help prevent problems with aphids, scale and other insects once plants are inside for the winter.

If you are going to overwinter any tender perennials like coleus, geraniums, sweet potato, gerbera daisy and so on you should be getting them potted if they are now in the ground. They can stay outside in pots until frost is predicted. Make sure to keep the pots watered.

 Collect seeds for saving. Store seeds in paper packets, not plastic.  Make sure they are ripe and dry before storage.

Take down hummingbird and jelly feeders when you feel hummers and orioles have left. Start feeding seed and suet if you don’t feed the birds all summer.

Those in northern zones should watch the weather predictions carefully now and be ready to cover or move plants inside if frost threatens. Many areas have frost by the end of September.

 Sneaky plants that cause sneezing

Goldenrod is beginning to bloom.  Before you start sneezing and laying blame on it, please understand goldenrod does not cause your seasonal allergies.  In late summer and fall, before a hard freeze, the primary culprit for seasonal allergies is ragweed, stinging nettles and amaranths.  Goldenrod, a beautiful showy flower is not the cause of allergies. 


Goldenrod pollen is heavy and doesn’t travel well on the wind.  Goldenrod is very beneficial for pollinators and it’s a pretty plant so leave it alone please. But if you have allergies don’t cut goldenrod and bring it inside.  Inside, in warm and dry conditions, the pollen dries out and may drift just enough to cause you problems.

There are several types of Goldenrod that can be found in the northeast but the two most common are Gray Goldenrod, Solidago nemoralis, and Tall Goldenrod, Solidago altissima.  Both have the sprays of tiny gold flowers for which the plant is named.  Gray Goldenrod is shorter, the flower sprays are not as wide and arched as Tall Goldenrod and each long narrow leaf has two short leaves by it where it attaches to the stem.  Tall Goldenrod can grow to 5 feet high in good conditions and the flower spikes tend to from a pyramidal shape at the top of the plant.  Both plants have rough, stiff stems and the leaves and stems are slightly hairy.

The sprays of gold are formed by hundreds of tiny yellow, daisy-like flowers which each have a nectar tube.  This nectar is an important food for butterflies fueling up to fly south and bees preparing for winter as is the abundant, heavy pollen.  Goldenrod begins blooming in late summer and blooms until a heavy frost. Goldenrod will grow almost anywhere, in sun and light shade, in moist or dry locations.  It’s a common roadside and field wildflower.

Ragweed

Ragweed is also blooming now, although most won’t notice its plain Jane flowers and it’s the cause of allergic symptoms for many people this time of year. Common Ragweed (Ambrosia artemisiifolia) has a Latin name many associate with something delightful, but this almost unnoticed plant is anything but delightful to millions of hay fever suffers. 

Ragweed was once confined to the east coast but has spread throughout the United States. Ragweed is an annual plant which begins growing from over-wintered seeds as soon as the soil warms above 50 degrees. Young Ragweed leaves have more rounded points to their divided leaves and may be spotted with purple. They are hairy on the leaf surface.


As ragweed grows, the leaves become more sharply divided. Many people mistake the Ragweed plants for marigolds or tomatoes as the fern-like leaves are similar. In cooler fall weather the leaves may take on a reddish or purplish tint at the edges. Ragweed plants can get quite large, up to 5 feet high and branching many times.  

In late summer, about the time goldenrod blooms, ragweed also blooms.  The small greenish flowers are clustered in long wands at the ends of branches and don’t draw much notice. The pollen that they release into the wind and which can float for miles, does make many notice it though. If you look at it under a microscope you could see the hooks and barbs each pollen piece carries, which can wreak havoc on human nasal and respiratory passages. 

Ragweed will grow in almost any soil, although it prefers heavy, moist soil.  It likes full sun but will tolerate some shade.  It is found in crops and gardens as a weed, on roadsides and in un-mowed fields.  The seeds of Ragweed can survive for more than 80 years in soil, waiting for the right time to germinate, so the plant is hard to eliminate.

Giant ragweed, (Ambrosia trifida), a relative of common ragweed, has 3 lobed (sometimes 5) palmate (hand like) leaves that remind some people of marihuana, hence the common name wild hemp. The margins of the leaflets are toothed, but not as obviously as those of true marihuana, and the leaflets much broader. And giant ragweed leaves do not have any of the pleasant qualities of marihuana. The leaves are arranged opposite each other on the woody stem. Both stems and leaves are covered with fine hairs.  The leaf stem is winged near the main stem. Some plants may have several large branches.  Plants have a short taproot and a large fibrous root mat.


The flowers of giant ragweed are greenish white and inconspicuous although the pollen they produce and release into the wind can cause much distress to hay fever sufferers.  Male flowers are produced on spikes at the top of the plant, so the pollen is better distributed into the wind. Female flowers are below them in short clusters in leaf axils.  Each female flower makes a single seed. 

The woody stems and seed pods of giant ragweed will persist well into winter. Plants will grow in sun or partial shade and prefer fertile, moist soil although they can pop up in many places. They grow from seed. It is a native plant and found throughout much of the US and Canada.


Stinging nettles

Stinging nettle pollen is also allergenic and it’s shedding pollen now too.  I know a lot of herbalists rave over stinging nettles and there’s much folklore involving cures but if you keep some around at least keep the flowers trimmed off so there won’t be pollen or seeds.

Stinging nettles is a tall (3-7 feet) sturdy perennial plant. The leaves are dark green, 1-6 inches long and heavily toothed on the edges. Leaves are arranged oppositely on the tough, squared stem. The plants usually aren’t branched. 


The surface of the leaves and stems are covered with hairs, some of which are larger and contain the poison that causes such misery. These hairs, called trichomes, are hollow, with a bulbous base that contains acetylcholine, histamine, 5-HT (serotonin), moroidin, leukotrienes, and possibly formic acid. They act like a needle to inject the poison as a defense. These hairs are meant to protect the plant from animals eating them and they do a good job. They also break off in human skin causing welts, stinging and itching.  When the plants are dried or cooked the poison disappears.

Stinging nettle flowers come in male and female versions on the same plant. They are small clusters of greenish white and appear in the leaf axils throughout the summer. The female flowers produce tiny egg-shaped seeds of tan to brown.


Amaranths, pigweed and others

Pigweeds, of which there are several types, began flowering in late June and bloom on and off until a hard frost. They can cause allergy symptoms when pollinating. Pigweeds belong to the amaranth family. This diverse family has some edible seeded varieties and some ornamental varieties such as Love Lies Bleeding, which allergy prone gardeners may want to avoid.  Lambsquarters, Chenopodium album, another common weed that blooms in late summer and fall can also cause allergy symptoms

Other than ornamental grasses and amaranths, most garden plants in the late summer garden do not cause any serious nasal allergy threat.  However, when some flowers are cut and brought indoors, the pollen dries out and has a greater tendency to cause nasal allergies, especially if allergy sensitive people are close to the cut flowers. Lilies, members of the daisy family and as mentioned, goldenrod are frequent culprits here. 

After a hard frost most pollen shedding will stop.  However, another nasal allergen trigger may then cause problems. Moldy tree leaves can trigger nasal allergies.  Plants that have heavy infestations of white fly, aphids or scale insects often develop sooty mold.  Sooty mold grows on sweet secretions or excrement from insects eating plant sap. Houseplants often have these pests and then can indirectly cause nasal allergies.

If your allergies peak in late summer, don’t blame goldenrod.  Instead look for the sneaky weeds that are the real culprits.


Catfacing, cracking and zippering in tomatoes

Catfacing is a term for tomatoes that seem to have constricted areas of flesh or cavities on the bottom of the tomato.  It may look like several tomatoes fused or that areas of gray, scabby tissue have divided the fruit. Catfacing may cause projections of flesh, often shown in photos where someone is giggling over the resemblance to a penis sticking out of the fruit.


                                                    Catfacing- photo credit Mississippi State Ext.

Another similar problem of tomatoes is zippering- it looks like the tomato has a zipper running up the side usually with a hole at one end of the “zipper”.  Zippering and catfacing often occur on the same fruit. They can be seen on green as well as ripe fruit.

Cracking usually occurs on the stem end and looks like scabby rings running around the tomato. Or cracks can radiate out from the stem downward, forming a star-like pattern at the fruit top. The fruit actually cracks open and heals in some cases, with the scabby cover forming or before it heals it may mold.  Both ripe and green fruit can crack, but ripe fruit is more likely to mold or rot after cracking.

All of these conditions are physiological disorders, that is they are not caused by disease. There is little you can do under garden conditions to prevent the problems.  Some varieties of tomatoes have more trouble with these problems, particularly large round fruited, older varieties. The fruits are lumpy and unappealing but perfectly edible. 

Catfacing and zippering are generally caused by interference with pollination/fertilization.  If tomato flowers don’t get pollinated correctly the fruit is misshapen.  Nights below 60 degrees during, or even for 3 weeks before flowering, or very hot and humid days during flowering are common causes. Insects feeding on flowers may damage reproductive parts, causing poor pollination.

If you are heavily pruning indeterminate plants, you may cause a lack of auxins (a plant hormone) which may also cause fruits to develop abnormally.  High levels of nitrogen may also be a cause.  Infrequently pesticide drift may be a cause.

Cracking is associated with water problems, usually too much water, sometimes by allowing the plant to get too dry and then watering heavily. If it’s hot and humid the cracks may develop mold and insects are attracted to the cracks also.

There is nothing you can add to the soil or put on the plants to solve these problems. Epsom salt or fertilizers will not help and can actually cause more problems. Choosing varieties resistant to the problems, like plum shaped tomatoes, could help if you frequently have these problems. The good news is that if the weather changes new fruit may not be affected.

Remove badly catfaced and all cracked tomatoes from the plant when you find them, so the plant doesn’t expend more energy on them and so they don’t attract insects. This will encourage more bloom, hopefully in better conditions.

Tomatoes affected by catfacing, cracking or zippering are safe to eat if they aren’t insect infested or moldy. Experts warn that they shouldn’t be used for canning though, as they may be hard to peel and harbor bacteria or be less acidic than normal tomatoes. Tomatoes with mild zippering are probably safe to use.  Canning is not for produce you don’t want to eat fresh; diseased, overripe, badly bruised or cracked produce should be used fresh or discarded.


Fresh salsa

When you have a lot of tomatoes at the end of the season you may want to consider making a quick batch of salsa. This salsa recipe doesn’t involve cooking and should be refrigerated if it isn’t eaten and saved for only a day or two. Don’t make too much, since it can’t be held long, but don’t underestimate how much you can scarf down with some good chips.

I don’t peel the tomatoes in this fresh salsa, and it works just fine.

Core some tomatoes and coarsely chop them. Measure what you have. 

For every 3 cups of chopped tomatoes add about a cup of chopped peppers and onion (combined).

For hot salsa use hot peppers, for milder salsa use bell peppers or sweet banana peppers. You can use any color peppers; many colors make for a pretty dish. Any onions can be used, I like yellow sweet onion like Vidalia in mine.

For about 4 cups of salsa add a ¼ cup vinegar, a teaspoon of sugar, salt to your taste and other seasonings.

Many people like the taste of cilantro in salsa so finely chop a bit and add it if you like it. Garlic is a good seasoning to add. Many people use a touch of cumin in salsa. Add some red pepper flakes if you want to up the heat. Play around with spices, add a bit at a time and taste until you get something you like.

I pulse the salsa a few times in a blender to smooth it out a bit. If you don’t mind coarsely chopped veggies you can skip this. Don’t over blend or you’ll have soup, just a pulse or two.  It will be very “juicy”. You can pour it through a strainer or simply pour a little of the fluid off.  I save this fluid for cooking, it’s great on steak or roast.

You can eat this salsa at once or cover it tightly and let it sit in the refrigerator for an hour or two to enhance the flavors. Tightly cover and refrigerate any leftover salsa. Toss out leftovers after two days.


“The old summer's-end melancholy nips at my heels. There's no school to go back to; no detail of my life will change come the onset of September; yet still, I feel the old trepidation.”


― Sara Baume, A Line Made by Walking


Kim Willis

All parts of this blog are copyrighted and may not be used without permission.


And So On….


Find Michigan garden events/classes here:

https://www.facebook.com/groups/118847598146598/

(This is the Lapeer County Gardeners facebook page)


Newsletter/blog information


If you have a comment or opinion you’d like to share, send it to me or you can comment directly on the blog. Please state that you want to have the item published in my weekly blog if you email me. You must give your full name and what you say must be polite and not attack any individual. I am very open to ideas and opinions that don’t match mine, but I do reserve the right to publish what I want.

If you are on an email list for this blog and wish to be removed please contact me.

Contact me at KimWillis151@gmail.com


Tuesday, August 25, 2020

August 25, 2020 cuttings and color

Hello gardeners

 Once again, I am sitting here wishing for rain. It’s been 10 days since we had any and its been hot for the last 5. I don’t like hot and humid weather.  We are supposed to get a cool down over the next weekend and I hope it’s the last of this heat wave stuff. But its 2020 so who knows?

If you have lived in the same area for many years, I’m sure you have recognized a change in weather patterns over the years.  I have lived here for over 25 years and I know it’s hotter and drier in summer than it was when we first moved here.

When we first moved here summer storms were frequent and they often featured intense lightning and heavy downpours. I would see lightning strikes in the farm fields across from us and lightning struck 2 trees on our property and a power pole in the first few years we were here.  Now it seems the storm track has moved about 100 miles north.

I don’t miss the lightning, but I do miss the rain and the coolness a storm brings. Our storms are milder, which is fine, and the last few winters have been milder too, which is great. I also keep written weather records and I know the weather has changed. What I worry about is that it will keep changing in this direction- hotter and drier.

This is the second year in a row our sweet corn has failed to impress. I know weather has something to do with it. I planted a variety I had success with in the past and it started growing well this spring.  Then the weather got hot and dry. I watered, but in raised beds the hot weather quickly dries out the soil.

I harvested some corn yesterday and while tasty, the ears were small, about 6 inches long. Many of them didn’t fill to the top, a pollination problem. I also know the garden area is shadier than it used to be. A mulberry tree grew up on the north side of the fence. It impacts the growing area only a little, slightly less sun in early am and late pm but it’s a factor. I think it’s my last year for planting corn.

My cucumbers are gone- dead from fungal disease. But the tomatoes soldier on. I am planting lettuce this week for fall.

The hardy hibiscus are blooming now.  I love those big gaudy flowers. And all of my tropical hibiscus are in bloom too. The ligularia is blooming and toad lilies will be blooming soon, as well as the snakeroot. In the fields, goldenrod is now blooming, a boon for the bees. I leave some here and there in my gardens for color and as bee pleasers.

It takes a lot right now to be friendly to bees. I had to remove one hummingbird feeder that was too close to a walk because they attacked anyone near it. I see them chasing hummers away from the feeders. While yellow jackets are the most aggressive and are technically hornets, they are also part of the ecology. Yellow jackets eat aphids and fly maggots along with other harmful insects. Bald faced hornets are also plentiful now.

The populations of all bees and hornets are higher now and they are all very busy and protective of their food sources as they prepare for winter. Bumblebees are nesting under the back ramp and while they don’t bother me- or so far my husband, they are bothering my dog.  He is jumping off the side rather than going over them.

So far, I am holding off on chemical control, although the yellowjacket nest under the front porch roof just may have to be treated. I have been soaking their nest area with a hard spray of water every night. They come out and attack the water! I wish they would just relocate. It’s hard to tolerate yellow jackets.


Making cut flowers last longer in a vase


In late summer everything seems to be abundantly in bloom and many gardeners cut flowers for inside the home. You may want to give big bougets of summer flowers to friends and relatives.  Here’s some tips to make the bougets last longer.

First start with a very clean vase, scrubbed with hot water and soap.  Bacteria are the biggest cause of early flower wilt and that awful smelling vase water. Don’t inoculate the water of a new batch of flowers by using a dirty vase. Don’t combine some older flowers that have been in a vase with new ones because you will bring bacteria clinging to the stems.

Always remove all foliage that will be beneath the water in a vase.  If you bought the flowers make a fresh cut on each stem before putting them in the vase.  Make stem cuts on a slant instead of straight across to expose more xylem tubes which take up water. Some people suggest cutting flower stems under water so no air bubbles get in the stem but this hasn’t be shown to be very effective in most research.

Fill vases with cold, clean water.  If you have “city water” its fine to use.  If you use a water softener at home, you should use bottled water.  Well water that isn’t softened is fine - but if it has its own smell or looks bad you may want to use bottled water. If you use well water put a drop or two of unscented chlorine bleach in the vase.

Another choice for filling vases is one part 7-Up or another lemon-lime soda to 3 parts water. Use regular, not diet soda. Clear soda looks best. The citric acid in the soda acidifies the water and inhibits bacterial growth. The sugar in the soda feeds the flowers just a bit.  Research has shown that this soda treatment does extend the vase life of flowers.

If you bought the flowers and you got a little package of “flower food” use it.  It’s a combination of a number of things that lower the bacteria count and feed flowers and really does extend vase life.

Every few days dump the water in the vase and refill with clean water or water- pop solution.  Keep the vase full to the top with water.

Things not to add to flower vases are aspirin tablets or vitamin tablets, (didn’t work in research tests), pennies, (the copper isn’t water soluble in our pennies) plain sugar (increases bacteria), vinegar, ( no results in research)or alcohol like vodka or gin, which don’t have any benefit according to research.

Putting your flower arrangement in the refrigerator at night will prolong its life. Misting flowers once a day seems to help. Keep arrangements out of the sun and away from heat sources. Remove wilted or dead flowers or foliage frequently.

Remember that some flowers just don’t last long in the vase.  An open daylily will be gone the next day regardless of what you do, (but daylily buds on a stem may continue to open). Some flowers require special treatment to remain pretty for even a few days. 

Long lasting cut flowers are roses, Asiatic and oriental lilies, glads, dahlias, Peruvian lilies, daisies, zinnias, mums, carnations, sunflowers, liatris, coreopsis, lavender, salvias, yarrow, phlox, asters, Echinacea, iris, bellflowers, daffodils, strawflowers, coral bells, obedient plant, gaillardia, and veronica.

If you are inside because it’s just too hot outside, at least make sure you surround yourself with flowers.


Plants for color in the late summer and fall shade garden


Color in late summer and fall is fairly easy to come by for a sunny garden.  But what about the shaded garden? How do you keep the color and interest going in your shady garden? Hosta are often the backbone of shady gardens but by late summer they often look tattered or start to die back.  Other foliage plants like heurchera may also look bedraggled by fall.

Some perennial plants though, are just beginning to reach peak and bloom by late summer even in the shade. Gardeners with shady spots may want to consider them. Here’s some of my favorites.

Ligularia dentata sometimes called Leopard plant is a large, impressive plant that has yellow daisy-like flowers in late summer. The plants are around 3 feet tall and wide at maturity, with large rounded leaves of deep green with a touch of bronze or maroon.  The golden yellow flowers appear in clusters above the foliage in late summer.  Hardy to zone 3.


Black Snakeroot – Cimicifuga racemosa- has lacy looking foliage, which in the most popular varieties is chocolate or purplish colored. Plants can get 4-foot-tall and 3 foot wide. In late summer they have wands of pretty pink or white, lightly fragrant flowers waving over the foliage. Its a native plant. Hardy to zone 4.

Toad lilies, (Tricyrtis hirta) have become popular as shade plants. They have stalks of tiny orchid -like flowers in shades of pink, purple, and yellow in late summer. Plants are about 30 inches high and 12 inches wide, with oval shaped, ribbed leaves. They form clumps which slowly enlarge each year. Hardy to zone 5.

Japanese anemones (Anemone hupehensis or Anemone tomentosa ), will bloom well in partial or light shade. Once established, which can take a year or two, they form a clump of foliage covered with branching clusters of pretty pink or white flowers. The flowers are 2-3 inches wide and seem to flutter in the breeze. They can bloom for 6 weeks in late summer, or until a hard frost. Plants can get 3 feet tall in favorable conditions.  Hardy to zone 5.

And don’t forget the annual shade lovers. Impatiens are popular, but wax begonias, fuchsia, pansies,(you can sometimes get them in fall) violas, tuberous begonias, torenia, lobelia, browallia, and coleus, polka dot plant, and caladium (foliage), can provide color in shade right up to frost.

Another trick for fall color in shade is to add potted plants like mums, asters, or dahlias. Although these prefer full sun, once they are in bloom, shade won’t harm them or stop them from continuing to bloom.  I usually have some pots of tuberous begonias that were slow to start blooming sitting around that I stick in the shade for fall color.


Reproducing plants from cuttings

In social media I am constantly seeing people ask about sticking a broken piece of a plant in water – or even a leaf- to start a new plant. People urge other people to cut up dying plants and root them in water. Every fallen leaf or broken stem is seen as the start to a new plant.

Plants have the remarkable ability to reproduce asexually, that is to grow a new plant from a piece of a plant. One of the advantages of producing plants through cuttings is that the new plant started from a cutting will be exactly like the parent plant, (with a few odd exceptions). Many greenhouses reproduce hundreds of types of plants from cuttings.

But starting plants from a cutting- which is a piece of a plant- isn’t always easy, especially if you are just sticking a piece of plant in water. Some plants simply can’t be started this way. And only a few types of plants can be successfully started from just a leaf.

Many gardeners seem so sad at having to discard broken pieces of plants. Some feel they can’t afford certain plants, so they want to steal or beg a piece of plant and start their own. And there’s a superstition that plants started from a sneaky “pinch” grow better. So, this article discusses starting plants from cuttings.


                                        Quick Points to remember


Not all plants can be easily started from cuttings, some are almost impossible to start this way.

Every plant species has different requirements for when and how to take a cutting and root it for the best results.

Rooting cuttings in water is not recommended for most plants.

Unhealthy or yellowing plant parts are not suitable for cuttings

Rose and other cuttings should not be started in potatoes.


 Now for more information

It’s probably possible to start any plant from a properly taken cutting but in many cases, it can be very difficult and unlikely. Even having a chance at getting a cutting to root of some species requires a tedious and exacting procedure. In fact, most species of plants require knowledge of when and how to take a cutting from that species and what rooting conditions they prefer if you want to be successful at starting them.

If you are interested in propagating garden perennials or woody plants, you should consult a reference on propagation. It’s impossible to provide information on a vast number of species here. A reference means a book, or an online site from a scientific source like Extension, a horticultural college, or an experienced specialty site for a species, like the Rose Society or Hosta Society.

It’s simply unrealistic to think you can plop a piece of any plant in water and it will root.  While there are some plants that will easily root in water (mostly tropical house plants) or from a piece of plant of leaf falling on the soil (sedums and other succulents do this well) most species require more planning and better rooting techniques.

Plants with a crown system of growth, think hosta and daylilies, may be difficult to start from cuttings. They are generally propagated by division, or tissue culture. Putting a leaf or stem in water will not result in a new plant.

Many plants with a woody stem or semi-woody stem, (trees, shrubs, some garden perennials and houseplants), can be started from cuttings only if you select the cuttings at the right time and start them with bottom heat and a misting system. The average perennial or woody plant in your garden cannot be started simply by putting a piece of it in water.

Some plants put out aerial stems with “babies” on them.  Spider plants and “hens and chicks” are examples. Other plants produce “pups” or suckers at the base. Those baby plants can be easily rooted, and some will root in water.  

 What to start cuttings in

If you are going to try starting plants from cuttings remember this.  Almost all plant cuttings start better in potting medium or another solid medium, like sand or peat, than they do in water. And plants you want to eventually grow in soil should be started in some sort of solid medium.  Reserve those water started cuttings for a few select species, or plants you want to keep growing in water. (Note: I’m not considering hydroponic growing here, which is a whole other subject and is not the same as starting cuttings in water.)

For rooting all cuttings, the medium – or “soil” should be a soilless mixture or milled peat or vermiculite for best results.  Don’t use garden soil or compost as these will often contain bacteria or fungi that will start rotting the cutting. Some people use clean sand for rooting cuttings, especially hardwood cuttings.

 Basics for all cuttings

All cuttings should have at least two nodes on them. Nodes are points along a stem where a growth bud is, usually where leaves are found or will grow. Some people refer to nodes as “joints”. Nodes may look like swollen or like wider areas on a plant stem.  In some plants there are many nodes close together and in others there are fewer nodes farther apart. 


One node on a cutting will form the upper part of the new plant or the shoots, and the other will form the root system. You must be careful not to damage the nodes when you cut pieces off the parent plant. Longer cuttings with many nodes are not necessarily better. Cuttings with more than 4 nodes may not root well.

Flower stems do not have nodes, that’s why cut flowers like zinnias do not root in a vase of water. Most leaf stems do not have nodes either. A leaf from an oak tree or a rhubarb leaf stem will not grow roots. In a few plants though, a leaf that lands on soil or is inserted into a medium, can start a new plant. Succulents like jade plants, burro’s tails and others have leaves like this. An African violet or rex begonia leaf can start a new plant.  But for the vast majority of plants a leaf cannot grow a new plant.

If cuttings are from the tip of the plant stem, they are called terminal cuttings.  Terminal cuttings usually grow faster than other stem cuttings.  The new growth will come at the end of the cutting, at the tip and you only need one additional node. If a piece of stem is cut into several smaller pieces, one piece at the end is the terminal cutting and the other pieces are just called stem cuttings. These stem cuttings will produce new growth from the side of the node.

Plant cuttings will root best if the end inserted in the soil or water to form roots is the end which would have been closest to the main stem of the parent plant (or bottom). This is especially true when making hardwood cuttings.  When making hardwood cuttings that will be stored for a while it’s a good idea to mark the “bottoms” of the cuttings with paint or marker above the cut end so you don’t forget which end is to be inserted into the rooting medium.

When dividing a stem into several pieces for cuttings make it’s a good idea to leave a small “handle “of stem above the top node of the section. This is generally cut on a slant. Pick up the cutting by the handle so you don’t damage the node which will become the upper parts of the plant. Beneath the bottom node of the cutting cut the stem straight across as close to the node as you can without damaging it. This part will go into the rooting medium.


Tips for different types of cuttings


Softwood cuttings are taken when the plant is growing and has leaves.  The stems are generally green and soft, without bark. These are the cuttings generally taken from houseplants all year round and tender herbaceous perennials in early spring or fall if you want to carry certain plants through winter.  The best softwood cuttings or stem cuttings come from growth the plant put out in the last few months.  By the way, softwood cuttings are the ones most likely to root in water.

Plants that start well from softwood are pothos, philodendron,  Tradescantia  or Zebrina,  bridal veil, purple passion plant, setcreasea, Swedish ivy, hoya, peperomia,  petunias, snapdragons, tomatoes, coleus, cane type begonias, wax begonias, impatiens, geraniums ( Pelargonium), sedum, creeping phlox, chrysanthemum, Cuphea, Dipladenia, fuchsia, Hedera ivies (Boston ivy and others),heliotrope, poinsettia, plus many more.

Softwood cuttings can be rooted at any time.  Prepare the cuttings by removing all but one or two leaves at each above ground node and all the leaves from the nodes that will be underground.  If the plant has very large leaves cut the leaves in half. Dip the bottom of the cutting in rooting hormone, which can be purchased at most garden stores. All plants won’t need rooting medium, but for the more difficult plants you’ll get better results using it.   

Make a hole in the moistened planting medium; do not push the cutting into the medium because this can damage the node that will make the roots.  Firm the medium around the cutting.  You can bury half the nodes in the medium and leave half above the “ground”. 

Some wilting of leaves left on cuttings is normal, sometimes the leaves even fall off, but the stem will remain firm and green and new leaves should grow if the cutting is “taking.”

Semi-hardwood cuttings are an intermediate stage between a young green steam and an older woody one. They may be from tropical plants which don’t have a dormant period or taken from plants outside of a dormancy period but before the stems have heavy bark.  Jade plants are an example, as are roses, grapes, ficus, jasmine, artemesia, buddleia (butterfly bush), lavender, caryopteris and brugmansia. Willows will start from semi-woody cuttings, hardwood or softwood. Rosemary can be started from soft or semi-hardwood cuttings.

Most garden plants propagated by semi-hardwood do best when cuttings are taken in late spring.  For some tropical plants the season is not important. These cuttings take longer than softwood cuttings to root.  Don’t let the soil get too wet or they will rot.  You may need to experiment to see if some semi-hardwood cuttings need to be enclosed in glass or plastic to start well. 

Many semi-hardwood rose cuttings are started under a jar right in the soil of the garden. The jars must be in a shaded area or it will be too hot inside.  That’s an old method of rose propagation and starting them in containers of soilless medium is better. Remember that only roses grown on their own roots should be propagated by rooting cuttings. Grafted roses are propagated by grafting cuttings on hardy root stock.

There’s a “trick” floating around online that you can start rose cuttings by sticking them in a potato. This does not work. All you will grow is potatoes.

Several cuttings can be placed in one container. Most people enclose the container in a plastic bag to increase the humidity. Make sure that the cuttings do not touch the sides of any covering as the pieces may rot at that spot.  If the enclosed area gets extremely wet remove the covering for a few hours.  Place these covered containers in bright light but not in direct sunlight.  Most of these cuttings do best in warm conditions.

Don’t tug at cuttings to see if they have rooted.  If several new leaves have developed the root system probably has too.  Carefully dig up the cuttings and pot them individually, if desired.  Fertilize the new plants lightly and move into the lighting situation the plant requires.

One special note- cuttings of succulents and cacti should be given a day or two for the cuts to heal and form a callus before being inserted into rooting medium.  I have found that cuttings of pelargoniums (common geranium) also respond well to a day or two of drying before they are put in rooting medium.

Hardwood cuttings are from woody ornamentals and a few indoor plants.  They are usually taken from wood about the size of a pencil and they are taken while the plant is dormant, held in cold storage and rooted just before the parent plant would break dormancy. These cuttings may have bark on the stems. Plants to try include willows, junipers, arborvitae, forsythia, euonymus, camellia, privet, gardenia, citrus, cypress, dogwood, blueberries, weigela, mockorange, mulberry, and rose of Sharon.

Hardwood cuttings are taken after the plants have gone dormant and they are then stored in a cold- below freezing - dark place for several months.  Hardwood cuttings are generally 8-12 inches long and should have several nodes. They should be kept moist- many people store them in a can of damp sand.

If the cutting is from an evergreen plant, remove most of the needles/leaves from the upper part of the cutting and all the needles from the nodes that will be inserted into the rooting medium.

About 6 weeks before the parent plants would normally come out of dormancy, bring the cuttings into a moderately warm 40-60-degree place for a week. Prepare moistened planting medium as for softwood cuttings, make holes in the medium for the cuttings, dip in rooting hormones and insert. I find that hardwood cuttings generally need rooting hormone to get started. Keep the cuttings in a cool – below 70-degree place in indirect light. Do not enclose these cuttings in plastic or glass but keep the humidity up in the room if possible. 

Alternately some people put hardwood cuttings in pots soon after taking them and store the pots in a cold area – even outside in trenches- allowing the cuttings to begin to grow when the parent plant does, or they bring the pots inside earlier and treat as above.

When you see new growth, you can carefully transplant the cuttings into individual containers, fertilize lightly and place gradually into brighter light.  It can take a long time for some hardwood cuttings to get growing well. I suggest growing them in containers for one season (to the next spring) before transplanting into the ground.


Problems and more tips

If you are having trouble getting a plant to root from a cutting, try adding gentle bottom heat. Seed starting mats or waterproof heating mats on low heat can work. Many professional propagators use a misting system on cuttings.  I find that starting cuttings outside in a protected area in early spring works well because misty, drizzly weather is common here in spring.  If a cold spell comes move the cuttings inside.  Make sure heavy rainstorms don’t beat the cuttings down or flood containers.

If you are having trouble propagating a certain type of plant, try taking cuttings at a different time of the year or using softwood instead of hardwood or vice versa.  Some plants are just very difficult to start from cuttings.

If the cutting doesn’t put out any new growth after a few weeks, or the bottom of the stem blackens, shrivels or turns mushy it isn’t “taking”.  Discard those and start over. 

Most plants are not hurt from trimming off pieces for cuttings and it even stimulates some plants to grow better. Start several cuttings if you can, it increases the odds you’ll get a new plant.  If you get all of them to grow you can share them with your friends.


Should you have a fall vegetable garden?

It’s late August and in the northern states it’s time to decide if you want a fall vegetable garden. Yes- a vegetable garden that you plant in the fall, some people do that. You need to decide soon because there isn’t that many days left in our growing season.  But do you really want and need a fall vegetable garden?

 Let’s take some time to discuss the pros and cons of fall vegetable gardens so you can make informed decisions.

The cons of fall vegetable gardens

For a lot of gardeners August is a miserable time to work in the garden.  It’s hot and full of mosquitoes and the beach is calling your name.  If you have a hard time keeping the garden weeded or even collecting your gardens harvest, you probably aren’t keen to start a new garden. Many people are going nuts trying to preserve the harvest they are reaping from their spring garden.  And that’s all right; you don’t need to feel guilty. 

You’ll need space for your fall vegetable garden.  If you have empty beds you are all set. But waiting for a crop to be finished so that you can use the space for a fall garden may take longer than you planned. And tilling up new areas probably is more work than you want to do in August.

Fall vegetable gardens are always a gamble anyway.  An early hard frost hits and you have done a lot of work for nothing.  Cool and rainy fall weather won’t make some crops happy. It’s often hard to find seeds this time of year to sow fall crops and starter plants are even scarcer. If it all seems like too much work to you then it probably is.  Just wrap it up for the season and rest with your garden soil.

The pros of fall vegetable gardens

Some people however may not have had time to plant a garden in the spring or for some reason their spring garden was ruined. These people may feel that their gardening urges are unfulfilled and are ready and eager to plant a vegetable garden in the fall. Or you may be worried that you don’t have enough fresh produce for the winter and want to add to your stores.  And you may just be bored and want to escape from household duties or your spouse for a few more weeks.  For you folks a fall vegetable garden makes sense.

Not every vegetable crop is suitable for a fall crop.  Some won’t produce fruit if the daylight is getting shorter as it does in the fall.  Some crops won’t have time to mature before a hard frost kills them.  A good tip to keep in mind is to use day neutral varieties, (which means the length of daylight doesn’t affect them) and use varieties that have the shortest days to maturity.

In planting zones 5 and 6 you may have 6-8 weeks before a hard frost if you plant in late August.  Some crops don’t mind a light frost, and some can be protected with row covers from a light frost. Crops that can be planted with a reasonable expectation of success include leafy greens of many types, kale, cabbage (early maturing varieties and started as plants), beets, turnips, radishes, carrots, green onions, peas, bush beans ( early maturing varieties and you may need row cover), broccoli and cauliflower- (early varieties). 

Remember that seeds sown in hot August weather may need daily watering to get them to germinate. Before you plant you should add some vegetable garden fertilizer to the bed, especially if it was already used this spring.  Don’t plant a crop in a bed that the same crop grew in in the spring or you are asking for disease and insect problems.

An alternative to a fall vegetable garden in the ground might be a few containers of things like salad greens and scallions. Then you can get the regular garden cleaned up and covered in compost and manure, while still munching fresh produce.  And containers are easier to cover when frost threatens, or you may be able to move them inside a garage or shed for the night.

So, the decision rests on you. You can harvest your crops, add manure and compost and head off to the family cabin. Or you can get out there and start a whole new garden. Which will it be?


August is ripening grain in the fields blowing hot and sunny, the scent of tree-ripened peaches, of hot buttered sweet corn on the cob. Vivid dahlias fling huge tousled blossoms through gardens and joe-pye-weed dusts the meadow purple.     

-Jean Hersey


Kim Willis

All parts of this blog are copyrighted and may not be used without permission.


And So On….


Find Michigan garden events/classes here:

https://www.facebook.com/groups/118847598146598/

(This is the Lapeer County Gardeners facebook page)


Newsletter/blog information


If you have a comment or opinion you’d like to share, send it to me or you can comment directly on the blog. Please state that you want to have the item published in my weekly blog if you email me. You must give your full name and what you say must be polite and not attack any individual. I am very open to ideas and opinions that don’t match mine, but I do reserve the right to publish what I want.

If you are on an email list for this blog and wish to be removed please contact me.

Contact me at KimWillis151@gmail.com