Hi
Gardeners
 It’s an absolutely beautiful summer day here in
Michigan, it makes it hard to sit inside and write. I sat outside for a while, its quiet midday
here in the country. The garden is in glorious color right now. If you don’t get close enough to see the weeds
it’s like a beautiful painting and so satisfying to know I helped create
it. I don’t feel rushed to get something
planted now, we are at the point of “it is what it is” now and because it
rained recently the colors are vibrant and I’m not worried about getting up to
water.
It’s an absolutely beautiful summer day here in
Michigan, it makes it hard to sit inside and write. I sat outside for a while, its quiet midday
here in the country. The garden is in glorious color right now. If you don’t get close enough to see the weeds
it’s like a beautiful painting and so satisfying to know I helped create
it. I don’t feel rushed to get something
planted now, we are at the point of “it is what it is” now and because it
rained recently the colors are vibrant and I’m not worried about getting up to
water.
I closed my eyes and listened to see how many birds I
could identify. The “pretty, pretty” of the cardinal, a robin scolding, a crow
cawing, a wren singing, the trill of a red winged blackbird, a killdeer calling,
the dee, dee, dee, of the chickadee. The
light breeze was making the cottonwoods rustle.
It wafted the scent of the lilies and cut grass to me. Around me the bees were so busy in the
flowers it sounded like the garden was purring.
A humming bird kept whirring by to get to the feeder. Across the road the horses were standing in
the shade and occasionally snorting. I
hope I can preserve this memory in mind to recall when times are bleaker.
When the Oriental lilies bloom like they are now it’s a
sign that summer is getting on - and the bloom cycle in the garden is at least two
thirds over. The Rose of Sharon is
blooming, tiger lilies, the phlox are starting to bloom and there are buds on
the mums and asters. Lots of hosta are
in bloom and rudbeckia Black- eyed Susan, Golden glow, helenium, beebalm, buddleia,
lavender, purple cone flowers, and late day lilies.
Five of my 10 new dahlias have now bloomed, I bought an
unnamed assortment and it’s interesting to see what I got. I have a pretty peachy- rose smaller single
flower, a compact small white pom pom flowered one, a huge bright red dinner
plate, a light pink single flowered and marron foliage, dark red flowered
one. Five more to be revealed!
Besides dahlias the cannas are beginning to bloom, and
the glads will be blooming in a day or two.
The annuals are at their peak right now, I have been getting some nice
bougets from my cutting garden.
I harvested some new potatoes last night and we have
been getting tomatoes, sweet peppers and cucumbers regularly. There are ears on the corn but I am sure not
happy about how poorly both varieties germinated. I am hoping there are enough plants for good
pollination. We’ve been snacking on
raspberries, and it looks like a bumper crop of blackberries are coming. The pumpkin vines are way out onto the lawn
now and there are some large pumpkins developing.

The
great gravel in the pot debate
This week on social media several sites have posted
about the practice of putting rocks or gravel on the bottom of pots for
drainage, in both pots with drainage holes and pots without them. There’s a controversy raging. Some very
respected garden professionals have said that this practice is not good and
that it will cause a perched water table in your pot- and rot your plants
roots. They have used science to show
that when water in one type of substance with a certain particle size meets
another type of material with different particle sizes and textures the water
stops moving- or perches. And it’s
absolutely true that this happens.
The scientific theory of water stopping at a different
level of particle size may be correct and scientifically replicable in certain
circumstances but how common in actual garden practice would water not move
through soil in a pot into a gravel layer at the bottom? I am never going to advocate putting gravel
in the bottom of a pot without drainage holes.
In a pot without a drainage hole there would be a time when the holes
between the gravel would be filled and the water would have nowhere to go. You
can’t see how much water is in there.
The water cannot evaporate well from down there.
Some water will be wicked back out of the gravel by
evaporation at the soil surface but it usually isn’t enough. And it’s true that it will be constantly
drawn up from that reservoir between the gravel spaces into the soil. But science
also tells us that at the interface of the soil layer and the gravel layer
water tends to heavily saturate the soil and not move quickly down into the
gravel layer, even if the spaces between the gravel are not filled with water. This
will keep the roots of most plants too wet, causing root rot. Using gravel in a pot without drainage holes
is very risky and gardeners shouldn’t do it.
All pots need drainage.
But in a pot with unimpeded drainage holes I cannot see
water perching at the top of the gravel layer in practice. I tried this
experiment numerous times. I marked two
clear cups so I would have the exact same level of gravel and soil in each
cup. I used the exact same soil in each
cup, sometimes a potting mix, sometimes soil from my garden but always the same
in both cups. And I used the same type
and amount of gravel on the bottom of the cups. One cup had drainage
holes. I used a measured amount of
water- the same for each cup. I dyed the
water blue so it was easier to see it.
Every time I did the experiment the water moved quickly
from the soil into the gravel spaces. In
the cup with the holes it drained out and the soil settled. The soil absorbed some water, but when there
was more water than the soil could hold it went into the gravel layer. In the cup without drainage the water
saturated the soil and puddled on the surface because the rock spaces were
full. Had I doubled the size of the
gravel layer in proportion to soil any water the soil couldn’t absorb would
move into the gravel. But if I kept
adding water eventually there would be no place for water to go.
Almost at once I realized why the water moved into the
gravel layer, defying what pure science would say. How can you place soil over a layer of gravel
without some of that soil moving into the spaces between the rocks? If you used very fine gravel less soil would
enter the spaces but over time at least some would. In coarser gravel/ rocks it settles in immediately. This allows the water to follow the same
particle size downward into the gravel and as water moves it brings particles
with it so over time the drainage would seem to get better.
I don’t think it’s necessary to put a gravel layer at
the bottom of a pot with drainage holes but I cannot see how it would in
practice cause a perched water table unless some odd perfect circumstances
existed, that is no soil entered the rock pores. Some people add things to a pot to make it
lighter-or heavier or just so that the pot uses less soil. If you do this you must have drainage holes
in the container bottom and they must drain freely, which may mean elevating
the pot off the ground a bit. You must
not prevent the soil from mixing with the rocks or whatever you are using on
the bottom by adding a layer of paper or cloth for example, on top of the
rocks.
In fact you should deliberately mix some soil with the
drain or filler material. Or you could
have a layer of soil around the edges straight to the pot bottom, with filler
in the center or vice versa. The best
thing to do though is to fill the pot completely with soil. That actually provides the best drainage.
Putting a few pieces of wood chips or broken crock in
the bottom so soil doesn’t wash through the holes is fine. I sometimes throw a large leave or two in the
pot bottom. By the time they decay roots
are usually holding the soil in place and it doesn’t stop water from moving
under them and out the drain holes.
So the science is right but in the average practical
use gravel on the bottom of a pot with
drainage holes wouldn’t result in a perched water table. It’s unnecessary to add rocks or other things
for drainage but if the pot drains freely it probably won’t hurt.
(I tried to upload a video I made of this experiment but the file is too big for the blog site. I'll try to put it on this FB site https://www.facebook.com/groups/623997204362467/?fref=nf )
Four
O’clock- Marvel of Peru (Mirabilis
jalapa)
Four O’Clocks are an old cottage garden flower that
many modern gardeners no longer grow, and that’s a shame because these plants
truly are the marvel their other common name, Marvel of Peru, suggests. In
warmer zones they can spread quickly, but the gardener should merely gift them
on to other gardeners or simply enjoy their bounty.

Four O’Clocks are native to South America, with Peru
probably the place Europeans discovered them.
They were moved all around the globe however because of their herbal qualities
and beautiful, strange flowers and have naturalized in many warmer countries. They were being grown in English gardens by
the late 1500’s and used in Chinese medicine long before that.
Four O’Clocks are perennial in zones 7b and above. In the north the tuberous roots of Four
O’Clocks can be dug and stored like dahlia bulbs. But since they also bloom quickly from seed
they can be treated like annuals in colder planting zones.
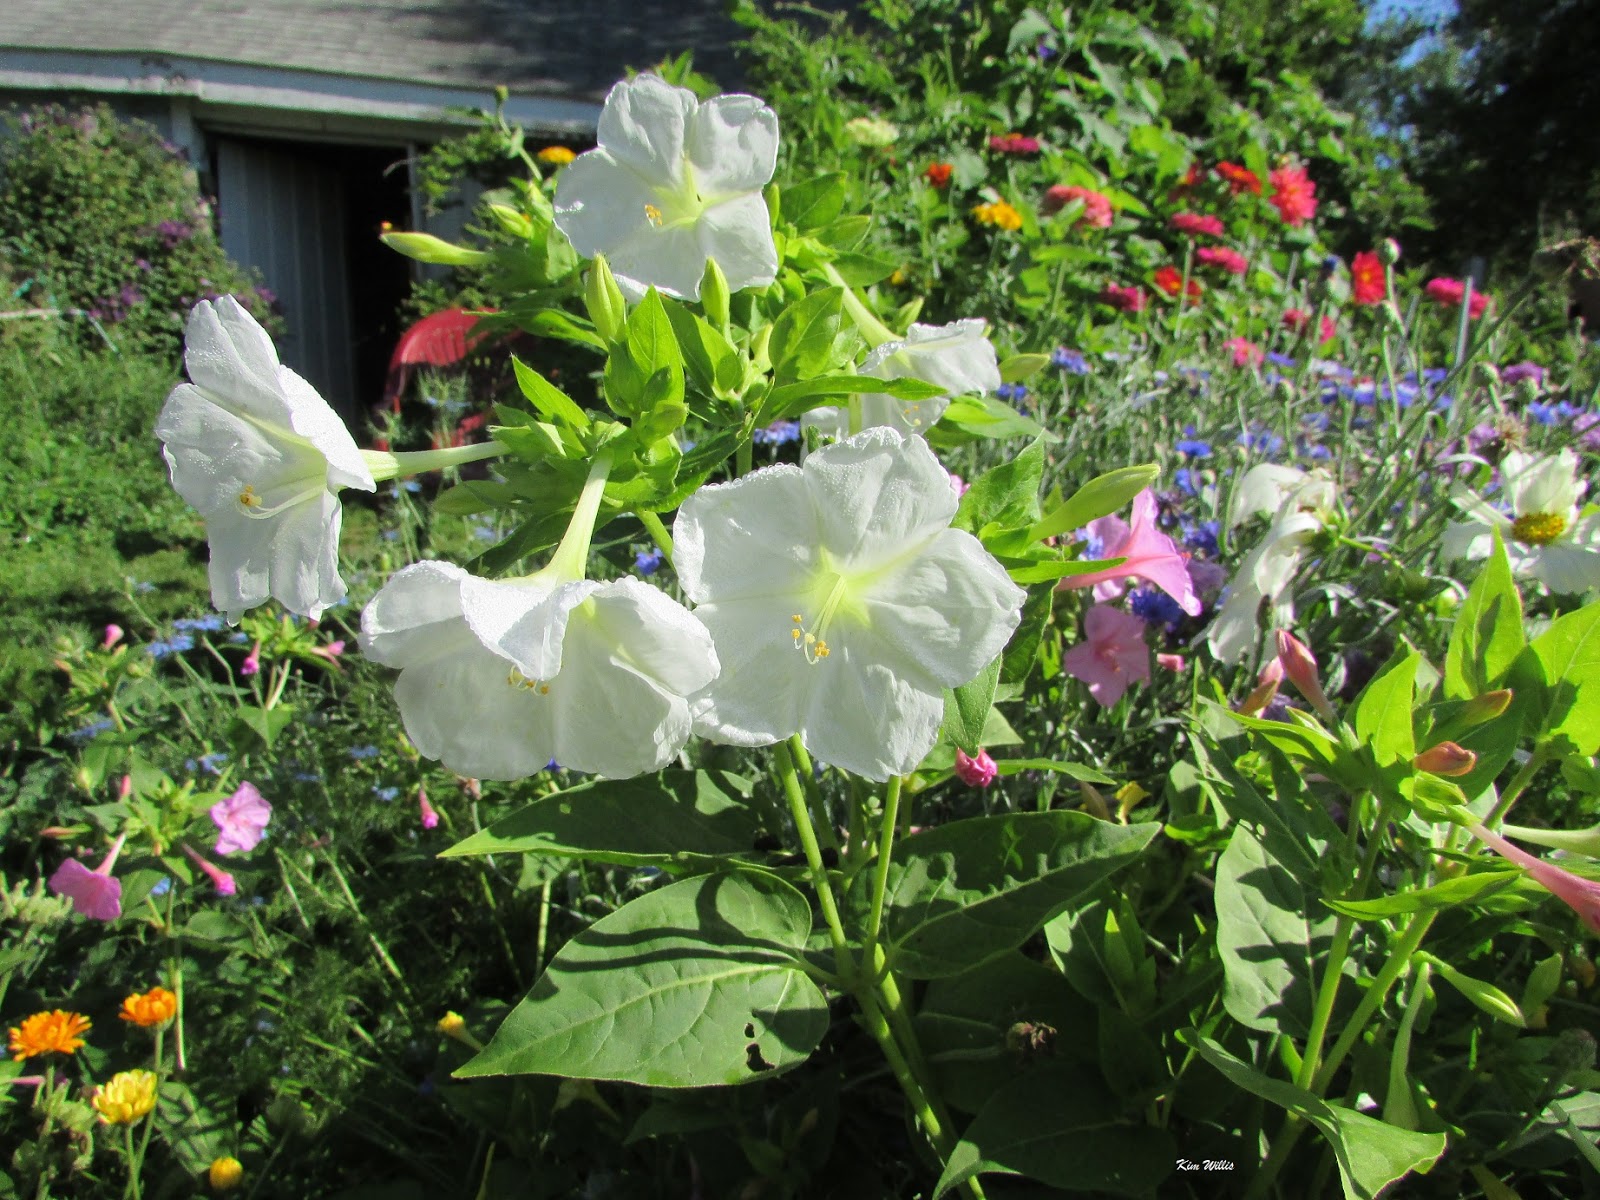
The
marvel of Four O’Clocks flowers
Let’s start with the beautiful, often fragrant flowers
of the Four O’Clock. The flowers seen
are actually formed by a colored, modified calyx, they don’t actually have
petals, though that piece of information is just some trivia for you, you won’t
notice the difference. This may be the
reason the flowers do their interesting color magic. The flowers are long and trumpet shaped,
flaring out to be about 1 ½ inches wide.
Four O’Clock flowers come in red, white, yellow and
pink and variegated. Now here’s the interesting,
magic thing. The flowers on the same
plant can be different colors, and plants may also change the color of their
flowers over time, with the plant having white flowers when it begins to bloom
and later in the season pink for example. When flowers are variegated- more
than one color, the variegation is usually unique to each flower. Variegation can be in streaks, blotches, or
the flower being half one color and half another. And the plant may produce variegated flowers
one month and solid the next.
Many but not all, Four O’Clock flowers have a pleasing
fragrance, a mixture of gardenia and orange blossom, on warm evenings. This, along with a bit of nectar, draws the
night flying sphinx moth and other moths to the plants for pollination. In my garden the white flowered Four O’Clocks
seem to be more strongly scented.
Four O’Clocks were named however, for another flower
attribute. They open up in the evening,
about four p.m. in most areas and close by about 11 am. This isn’t because of light changes, but
temperatures falling in the later part of the day. When it’s cool and cloudy flowers may remain
open all day. And while night flying moths
may be the best pollinator hummingbirds and day flying butterflies are also
attracted to the flowers when they are open. Four O’Clocks have been used in “floral
clocks.”
Other
plant parts
The leaves of Four O’Clocks are broad ovals and
attached opposite each other on the stem.
Most leaves are a medium green, and somewhat glossy but there are plants
with variegated foliage. Plants are
usually well branched and grow about 2 feet high. They are evergreen in the warmest areas but
may die to the ground in other areas.
Four O’Clock plants have black tuberous roots shaped
like a thick carrot. In cold winter areas the tubers can be dug and stored
inside over the winter.
Four O’Clock flowers produce a single fruit with one
black wrinkled seed. All parts of the
plant have some use in either herbal medicine, cosmetics or as dye plants. There are some edible uses but caution has to
be used as too much of the plant can be toxic.
I would list the plant as mildly to very toxic depending on the plant
part and how it’s consumed. It’s not the
plant to grow for salad.
Growing
Four O’Clocks
I rarely see plants offered in nurseries so most
gardeners will generally start them from seed unless you can get some tubers
from another gardener. They grow easily
from seed and will flower the same year.
Northern gardeners, (7a and lower), would be better off starting the
seed inside about 6 weeks before the last frost and transplanting outside after
frost danger has passed. Because they
have a tap root, start seeds individually in paper pots or peats pots so they
are easily transplanted. Four O’Clock seed can also be planted directly in the
garden where you want it to grow.
Four O’Clocks need full sun, although in very hot
climates they will do fairly well in partial shade. They aren’t fussy about soil. They can withstand some dry conditions but do
better with regular watering. The plants
have very few pests or diseases, aphids are sometimes a problem. Knock aphids off with a strong stream of
water. Four O’Clocks are seldom touched
by deer or rabbits.
In planting zones 7b-8a it might be a good idea to
mulch plants heavily in winter. In zones
7a and lower the plant can be dug after a light frost. Cut the foliage back to about an inch and let
the tubers dry in a warm shady place for a day or two. Then store in a cool place above freezing
packed in wood shavings. Plant outside in
spring after frost danger has passed.
Herbal
and other uses of Four O’Clocks
For those who like herbal medicine Four O’Clocks are a
gold mine. I do want to urge caution
with using this plant, especially when consuming it, as it can be quite poisonous. Modern science has confirmed that Mirabilis jalapa does have many
medicinal chemicals and many uses for the plant are being explored.
Root extracts of Mirabilis
jalapa have antiviral properties and a patent has been awarded for a
product that helps control tobacco mosaic virus and other plant viruses. In
herbal medicine the powdered root was used on injuries and abscesses. The powdered root was also baked into
cornbread and given to women with menstrual problems. Powdered root was also considered to be an aphrodisiac.
Root extracts also have antifungal
properties.
The roots also have some blood sugar lowering
properties and are being studied for use in the treatment of diabetes.
Four O’Clocks have been shown to have pain relieving and
antispasmodic properties and was often used for gastrointestinal problems such
as colic and diarrhea. Boiled leaves or leaf extracts are used for this and are
also used on painful wounds, for sprained or injured muscles and other
pain.
Leaves and stems have anthelmintic (worm killing
properties). Leaf poultices were used to
remove freckles and skin spots. Leaves
and roots are also diuretics and emetics.
The flowers of Four O’Clocks are mashed and boiled to
make an edible red dye for foods and also to dye cloth.
Plants are used for bioremediation of soils,
they take up and store harmful chemicals.
Flowers are used in the production of gold nano particles also.
Here’s a resource for science based information on
medicinal qualities.
International Journal of Pharmacological Research
www.ssjournals.com
ISSN: 2277-3312 Journal DOI:10.7439/ijpr
IJPR Volume 6 Issue 05 (2016) 160
Caution- only people experienced in herbal medicines
should use Four O’Clocks in this way.
Pregnant women should not use it.
Do not eat Four O’Clocks despite some references claiming its edible
when boiled. This has resulted in some
serious poisoning cases.
Four O’Clocks are interesting flowers on their own
merit and you don’t have to have a medicinal use for them to enjoy them. Children are often fascinated by the changing
flowers. They are an excellent plant for low maintenance and cottage gardens.
Try some in your garden.

Tip
to remove stains on your hands
By accident I discovered this handy solution to stains
on your hands and arms. I got roofing
tar on my hands and soap won’t wash that off.
I hate using gasoline or turpentine on my hands because it dries them
out and smells. So trying to find
something creamy I could put on my hands and maybe rub off with the tar, I
picked up a stick of solid deodorant that was almost used up and rubbed it on
the tar.
To my amazement simply rubbing the solid deodorant over
the stains took them off, without even scrubbing hard. The top of the deodorant stick got dirty
looking and I wiped it off on a paper towel a few times but wow- soft, nice
smelling stain free hands with little hard work.
Solid deodorant sticks contain both oils and alcohol,
which may be why they work on stains. I
don’t think it would matter what kind of deoderant. I also used it to remove grass stains off my
hands after weeding, and it worked well for that too. It would probably take off oil base
paint. I haven’t tried it on
clothes. But you may want to put a
travel size stick of solid deodorant with your garden tools.
Two
Tomato topics - Blossom end rot and Tomato hornworm
In July home gardens begin producing those luscious
ripe tomatoes everyone craves. But
tomatoes can be tricky little devils when it comes to getting them to produce
perfect fruit. One of the problems home
gardeners may face is blossom end rot.
This is a gray- black, leathery looking sunken area at the bottom of the
tomato. It can be cut off and the tomato
is safe to eat but not it’s not safe to can.
But many people feel the rotted area affects fruit taste as well as
spoiling the looks of the fruit.
Tomato end rot is caused by a number of factors but
they all boil down to not getting enough water to tomato fruits. This can be because of genetics; some
varieties have less efficient root systems, it can be because the roots were
restricted by a small container or root damage occurred. Usually though, the cause of tomato end rot
is simply not enough water.
 |
| Blossom-end-rot-David Langstron U of Georgia Bugwood.org |
In July and August tomato plants are growing quickly
while trying to also support lots of fruit.
In hot, dry weather the plant loses water rapidly from its leaves in
transpiration/ evaporation and in an effort to cool the plant and maintain
turgor the tomato plant pulls water from developing fruit to send to the leaves
and stems. It can always make more fruit
when conditions improve. This results in
the sunken, cell damaged area at the bottom of tomato fruits.
What
helps
Epsom salt will
not help with blossom end rot, nor will crushed eggshells, tums, baking
soda or any other exotic home remedy.
Calcium deficiency is often cited as a reason for
blossom end rot but most soils are not deficient in calcium, plants just need
lots of water to access the mineral. It
doesn’t hurt to use a liquid fertilizer for tomatoes which contains extra
calcium if you follow label directions.
But your plants still may need additional water.
To prevent tomato end rot make sure your tomato plants
have plenty of water. They need an inch
or more a week, on a regular schedule, perhaps divided into 2 or 3
waterings. Plants should never be
allowed to wilt, but damage to fruit can show up even before the plant
wilts. Put up a rain gauge and when
there hasn’t been an inch of rain in seven days use supplemental watering.
Water plants deeply, the first two inches of soil should be moist. A large tomato plant with fruit can usually
absorb 2 gallons of water if it has been dry.
If your plants wilt – water right away.
Water tomato plants at their base and well before dark
to help prevent fungal disease. If the leaves stay wet overnight the plants are
more likely to support the growth of fungal spores. Tomato plants in containers
may need watering once a day – even twice a day. And the containers should be large enough to
support a good root system. Anything
that restricts the roots of tomatoes, such as hard packed clay soil, can also
cause blossom end rot.
Surprisingly if a tomato is overwatered, particularly
in a pot with poor drainage, the roots of the plant may rot and once again the
plant stems and foliage will be left without sufficient water. This can cause the same symptoms as too dry
conditions, including blossom end rot, because the roots are unable to furnish
the plant with enough moisture. Check
the soil in pots before water is added.
In short blossom end rot is caused by a tomato plant
allocating precious water to stems and foliage by taking it from the tomato
fruit. This causes cell damage on the
bottom of the fruit, which then rots.
Keeping tomato plants watered deeply and consistently will prevent
blossom end rot from occurring.
Tomato
hornworm
Those big green “worms” you find eating your tomatoes
in your Michigan garden came from a rather pretty moth that you probably didn’t
mind in your garden. The fat green
caterpillars are known as tomato or tobacco hornworms. These little buggers can go from eggs to tiny
caterpillars to huge fat caterpillars 4 inches long and as big around as your
thumb in a matter of 3 weeks. To grow
that fast they eat a lot of your tomato plant, preferring leaves and green
fruit.
Tomato hornworms have a large curved spine or hook on
the upper side of the rear end that can be either red or black, depending on
the species. The caterpillars start out
a lighter, yellow green color but soon their green bodies are the same shade as
tomato leaves. Tomato hornworms are
hairless and the body is marked with a series of white v shaped markings and
tiny black lines that look like stitches.
Along the bottom edge of the caterpillar are round spots outlined in
gold that almost look like grommet holes.
To confuse predators there are two round markings on the hook or rear
end that look like eyes.
 |
| Tomato hornworm Manduca sexta |
The
tomato hornworm life cycle
There are actually two species of moths that lay eggs
on tomatoes that turn into the munching destroyers, tomato hornworms. Manduca quinquemaculata is the tomato
hornworm, whose caterpillar has a black horn and Manduca sexta is the Tobacco Hornworn, whose caterpillar has a red
horn. Both types eat tomatoes. The moths
are often called sphinx or hawk moths.
They are large, up to 6 inches in wingspan, fat bodied, brown mottled
moths, sometimes marked with brighter yellow or orange.
Like many moths hawk moths are generally active at
dusk. In some areas both species of moths and caterpillars of both hook colors
are present. The adult moths do not eat
tomatoes, they sip nectar. They lay
single pale green eggs on the undersides of leaves of tomato, pepper, eggplant
and potato plants and weeds in the same family such as nightshade and
horsenettle. While the caterpillars
occasionally eat these other plants they prefer tomatoes.
In zones 5-6 tomato hornworms are usually noticed about
the first week of August and they generally feed for a few weeks before falling
to the ground. The caterpillars burrow into the ground and turn into pupa. The pupas are brown, hard, shiny, worm-like
things with a curved “handle” on the front end, generally found buried in a few
inches of soil.
In the north there is generally only one generation a
year, in the south there may be two generations. The tomato or tobacco hornworm
over winters as a pupa. Moths may come
from warmer areas in the spring to lay eggs also. While tomatoes are their favorite garden
plant hornworms will sometimes eat peppers, eggplant and potatoes. And of course they also eat on tobacco plants
in the south.
Finding
hornworms
The first sign you might notice of the tomato hornworms
presence is green or blackish green pellet-like excrement under and on
plants. There will be lots of bare stems
and partly eaten green tomatoes, particularly at the top of the plant.
Hornworms rarely eat ripe tomatoes. In the last week or so of the caterpillar
stage their appetite is enormous and the damage becomes very noticeable. The caterpillars may have been on the plants
for weeks. Caterpillars do move from
plant to plant if the plants are close.
It takes a sharp eye to spot the culprit as tomato
hornworms are perfectly camouflaged as they lie on tomato stems. Smaller hornworms may hide on the undersides
of leaves. Stay still and quiet and you can sometimes trace them by their
munching sounds. Usually they are found near the top of plants.
Tomato hornworms will not kill a tomato plant although
the damage can look bad for a while.
They do destroy a lot of young fruit if left unchecked. There are usually only a few tomato
hornworms per plant. To find the hornworms
scout each plant carefully and look right above any piles of greenish-black
caterpillar poop. They are more easily
found in the early morning or evening when they are most active
Control
of tomato hornworms
Tomato hornworms have few natural predators although
chickens sometimes eat them. They are
filled with tomato foliage, which is poisonous, although a chicken eating one
or two doesn’t seem to have any problems.
Here are some ways to control hornworms.
Handpick them and squish them. If you are squeamish
about handling tomato hornworms you may be able to pay a kid to look for
them. They do not bite or “sting” humans
and the hook is harmless.
Use insecticidal soaps formulated for garden plants.
Use a Bt product.
These only kill caterpillars.
Use a garden insecticide safe for food plants. Insecticides with carbaryl, spinosod,
permethrin, or bifenthrin will work.
Read and follow label directions carefully.
Till the soil in the fall to bring pupa to the surface
to freeze and rotate the area where you grow tomatoes each year.
If you notice a rather sluggish tomato hornworm with
small white projections all over it leave it alone. The Braconid wasp lays its eggs on living
hornworms; they feed on hornworms, weakening them and then turn into the little
cocoons which are on the caterpillar.
Each cocoon will turn into a wasp which lays eggs on more caterpillars,
keeping their numbers in check.
Tomato hornworms are excellent fish bait. If you are a fisherperson you may want to
check the tomato plants before you head to your favorite fishing hole.
While tomato hornworms are startling and scary to some
people they are easier to deal with than some other tomato problems. Do not rip out your plants. Gardeners will find that they can harvest
plenty of tomatoes with just picking the caterpillars from the plants at the
first sign of damage.
10
hotdog makeovers
Its grilling time again and hotdogs are always a
favorite, especially for kids. But if
you get tired of the same old hotdogs here are some quick hotdog makeovers that
will make wiener eating interesting again.
And you don’t have to use the grill if you don’t want to, some of these
can be baked or steamed inside.
Hot dogs are inexpensive and quick to cook. Pair them with baked beans and potato salad
and you’ve created a great summer meal.
Use some of the interesting makeovers below and make hotdogs a great
meal for entertaining adult guests also.
1. Steam them in beer.
Place a small amount of beer in a shallow pan, maybe an inch deep, add hotdogs and put them on low heat so the beer is
barely simmering. Once they have plumped and cooked, they could be thrown on a
grill to brown them. Keep watch over the
pan so it doesn’t boil dry, add beer from the can you’re holding as necessary.
2. Simmer in pineapple juice. Once again use a shallow
pan, add about an inch of unsweetened pineapple juice and let the hotdogs
simmer in it. Add juice as needed. These are great served on Hawaiian style
buns.
3. Better with bacon. Split
hotdogs down the middle, don’t cut all the way through. Fill the inside of the hotdog with finely
chopped onion, a little pickle relish and mustard. Wrap each dog tightly with a piece of bacon
and secure with a toothpick. These can
be grilled or baked in the oven.
4. Cheese and bacon dogs. Fry one slice of bacon for
each hotdog until it’s browning but not crispy. Steam, boil or grill hotdogs until they are
almost done - probably 5 minutes on a
grill. Remove from heat. Split down the middle and sprinkle with finely
shredded cheese- cheddar is good. Wrap
hot dog in the bacon slice to hold dog together and secure with a toothpick. Return to grill or put under a broiler until
the bacon is crispy and cheese melted.
5. Hotdog cover up. No buns will be needed
here.
Buy a can of refrigerated crescent
rolls. Unroll the dough and separate
each piece. Prepare hot dogs by splitting down the middle and filling with
chopped onion, mustard and shredded cheese.
Crescent rolls usually come in a triangle shaped piece. Lay a hotdog on the large end of the dough and roll the dough around the
dog. Secure with toothpick if
needed. These are best baked or grilled
over low heat.
6. Kraut and dogs. Simmer hotdogs in a
shallow pan of sauerkraut. Pile heated kraut
over dog on bun and add mustard.
7. Bacon and mushroom dogs. Use about a 1/2 pound of
bacon to a package of hot dogs. Put
the hot dogs and bacon in a pan. Cook
until the bacon is crisp and hot and the dogs are plump and splitting. Remove dogs and bacon. Keep warm. Pour off all the grease except 2
tablespoons. Placed sliced mushrooms in
the pan with the bacon grease and a
tablespoon of butter or if you must, margarine. Cook and stir the mushrooms
until soft and heated, just a few minutes.
Crumble the cooked bacon into the mushrooms. Place hot dogs on buns and sprinkle with
cheddar cheese shreds. Add a spoonful of bacon and mushrooms.
8. Barbecue hotdogs. Barbecue sauce isn’t just
for ribs and chicken. Lay dogs in a pan
of your favorite sauce, cook slowly and turn two or three times. Sweet sauces go good with hot dogs.
9. Peppery hot dogs. In a shallow pan place
about an inch of water. Add 1 cup of diced
hot peppers, (serrano, chile, jalapeno), 1/2 cup diced onion and a teaspoon of
salt. Prepare hotdogs by poking several
holes in each with a toothpick. Simmer hotdogs slowly in the pepper water. Turn
from time to time and add water if necessary. The longer they sit, the hotter
they get. The best way to serve is with some roasted red or green sweet
pepper and some nacho cheese poured over the bun.
10. Deep fried hot dog- Got
a turkey fryer or better yet a small basket fryer? Fill with oil according to your manual and
fry the dogs. Make sure to remove hot
dogs from the fryer before they get hard.
If you slice them down the middle except for about an inch at one end
before you drop them in the fryer they will curl while frying and could be
placed on a burger bun instead of a hotdog bun.
Using a good quality bun will make any hotdog taste
better. Lightly toasting the buns,
spread with a little butter, makes them even yummier.
Get
out there and enjoy your garden while you can!
Kim Willis
“He who has a garden and
a library wants for nothing” ― Cicero
© Kim Willis - no parts of this newsletter may be used
without permission.
And
So On….
Do you have plants or seeds you would like to swap or share? Post them here by emailing me. You can also
ask me to post garden related events. Kimwillis151@gmail.com
Find
Michigan garden events/classes here:
(This is the Lapeer County Gardeners
facebook page)
An
interesting Plant Id page you can join on Facebook
Here’s a
seed/plant sharing group you can join on Facebook
Newsletter/blog
information
If you would like to
pass along a notice about an educational event or a volunteer opportunity
please send me an email before Tuesday of each week and I will print it. Also
if you have a comment or opinion you’d like to share, send it to me or you can
comment directly on the blog. Please state that you want to have the item
published in my weekly note if you email me. You must give your full name and
what you say must be polite and not attack any individual. I am very open to
ideas and opinions that don’t match mine but I do reserve the right to publish
what I want. Contact me at KimWillis151@gmail.com
I write this because I
love to share with other gardeners some of the things I come across in my
research each week. It keeps me engaged with people and horticulture. It’s a
hobby, basically. I hope you enjoy it. If you are on my mailing list and at any
time you don’t wish to receive these emails just let me know. If you know
anyone who would like to receive a notification by email when a new blog is
published have them send their email address to me. KimWillis151@gmail.com


